ADA Toilet Dimensions: A 2026 Compliance Guide

Sidharth Nayyar
TL;DR: Under the 2010 ADA Standards for Accessible Design, the core ada toilet dimensions are a toilet seat height of 17 to 19 inches, a toilet centerline 16 to 18 inches from the side wall, and enough maneuvering room for a 60-inch turning space or T-shaped turn. If those dimensions are off, the restroom may look finished but still fail accessibility in actual use.
A lot of teams reach this topic at the worst possible moment. The partitions are in, tile is done, the owner walkthrough is scheduled, and someone finally asks whether the toilet was laid out from the right reference point. If the answer is no, the fix is rarely small. It can mean moving plumbing, reworking walls, replacing accessories, and delaying occupancy.
That’s why ada toilet dimensions need to be treated as field-critical, not as a note buried in the drawing set. The measurements matter because people use them to transfer safely, position mobility devices, and use the restroom without assistance. Code compliance and user experience are the same issue here.
Why ADA Restroom Dimensions Are Non-Negotiable
A restroom can look finished, clean, and code-complete during a walkthrough and still fail the user the first time someone tries to transfer from a wheelchair. I see that happen when a dimension is technically close but functionally wrong. An inch lost to tile build-up, a dispenser placed in the wrong spot, or a partition line shifted in the field can turn a compliant layout into a barrier.
These dimensions are required because they protect independent use. The 2010 ADA Standards for Accessible Design do not leave toilet room layout to preference or rule of thumb. They establish fixed relationships between the toilet, walls, grab bars, clear floor space, and approach path so a person with a disability can use the room safely and with dignity. For a broader planning reference on ADA-compliant bathroom dimensions, compare the room-level layout against each fixture location before the drawings go out for pricing.
What project teams usually miss
On real projects, compliance problems usually come from coordination failures, not bad intent.
- Measurements are taken from the wrong reference point: Finished surfaces control. If one trade measures from framing and another measures from tile, the final installation can miss the required location.
- Each trade installs its own scope without checking the whole user path: Plumbing rough-in may be right, but partitions, accessories, and door hardware can still block use.
- Accessibility review happens after installation decisions are locked in: At that stage, even a small correction can mean reopening walls, moving carriers, or replacing products.
The practical trade-off is simple. Early coordination costs time in design and layout review. Late correction costs money in demolition, schedule impact, and owner frustration.
Project teams also benefit from understanding the broader meaning of accessibility, including digital access. This guide on what does ADA accessible mean is a useful reference if the owner is treating ADA as a checklist instead of an equal-use requirement.
The Core ADA Toilet Dimensions Seat Height and Centerline
The two measurements that drive most toilet layout decisions are seat height and centerline location. Get these wrong and the rest of the stall usually unravels.
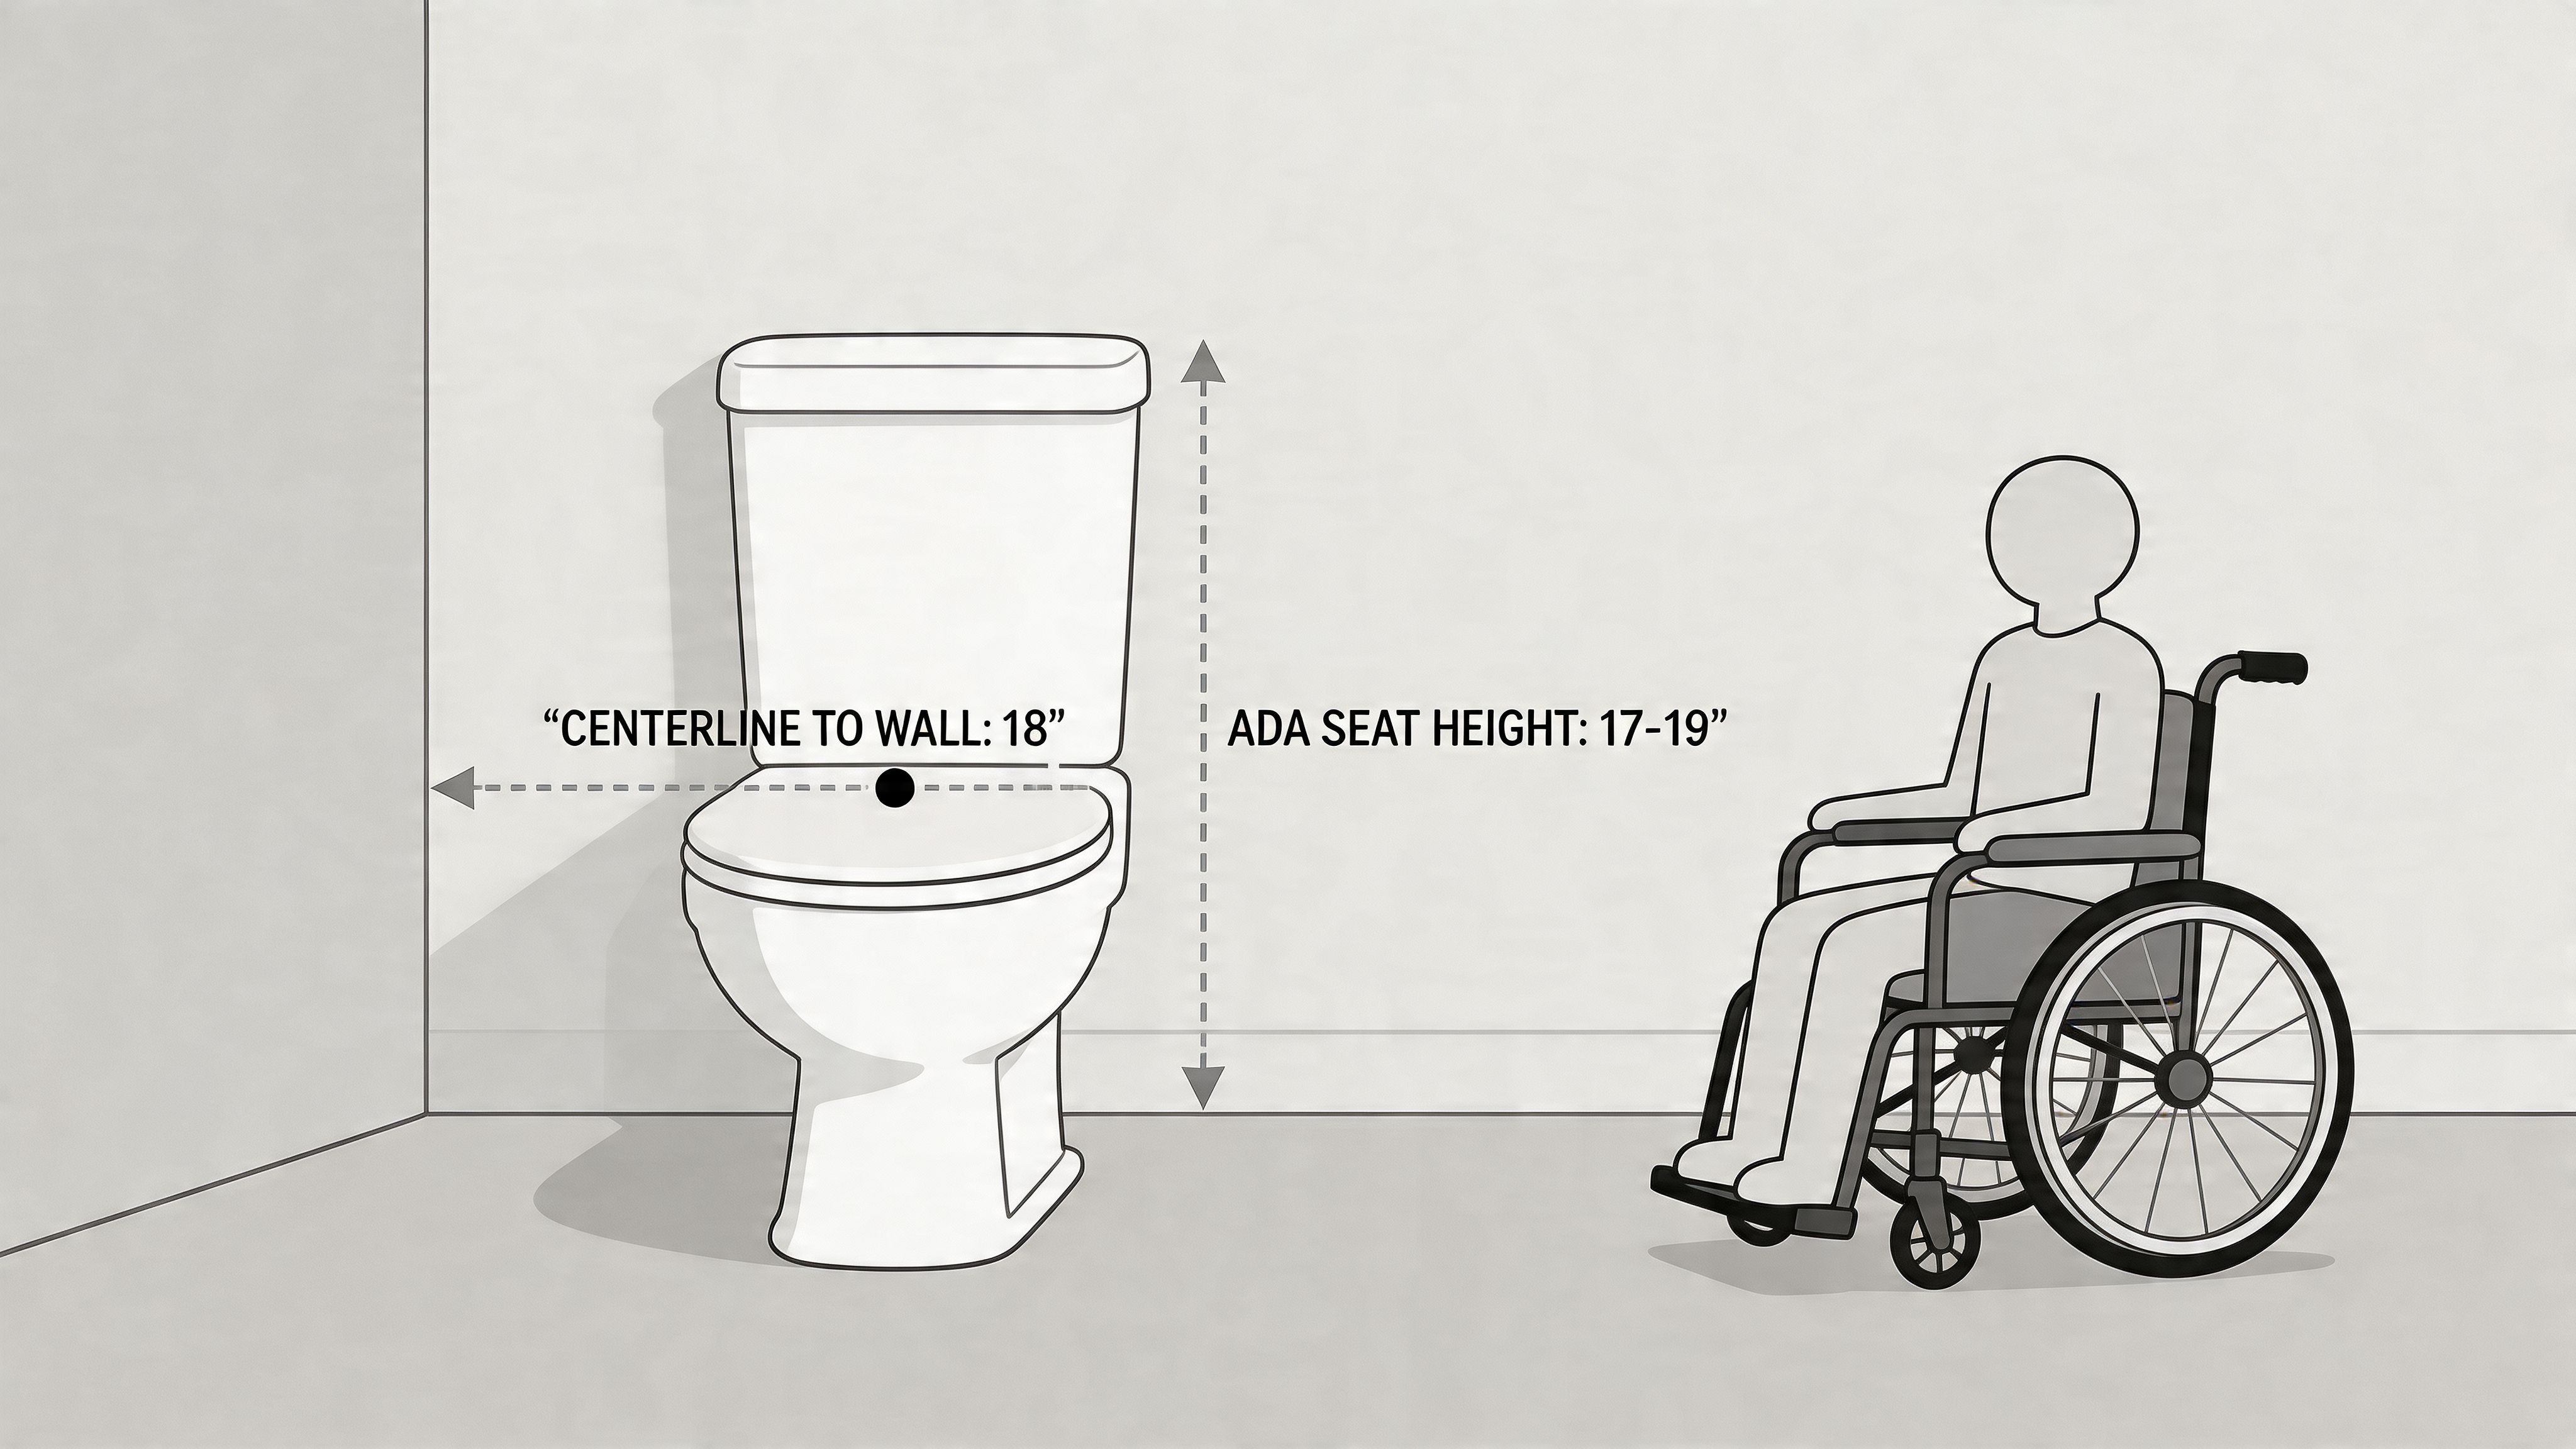
According to the 2010 ADA Standards for Accessible Design, the toilet seat must be 17 to 19 inches (430-485 mm) above the finished floor, and the toilet centerline must be 16 to 18 inches (405-455 mm) from the side wall or partition under Sections 604.2 and 604.4, as summarized by Orton Baths’ ADA toilet requirements guide. Those dimensions were refined in the 2010 Standards effective March 15, 2012.
Why these numbers matter in use
A compliant seat height supports safer transfers. If the seat is too low, many users have to drop down farther than they can control comfortably. If it’s too high, the transfer can become unstable in the opposite direction.
The centerline dimension matters for reach and body positioning. It creates the relationship between the toilet, the side wall, and the grab bars that a wheelchair user depends on during transfer and repositioning.
What works on actual projects
These checks catch most field errors before inspection:
- Measure from finished floor to the top of the installed seat, not to the bowl rim.
- Measure centerline from the finished side wall or partition face, not framing.
- Confirm product submittals early, especially when the toilet, seat, and carrier come from different manufacturers.
If your team is building internal standards for restroom reviews, ada compliance solutions become useful as a governance model. The point is consistency. Every drawing review, submittal review, and punch walk should test the same required dimensions.
Essential Clear Floor Space Requirements
An accessible toilet doesn’t help if the user can’t position a wheelchair next to it. Clear floor space is what turns a compliant fixture into a usable one.
The verified guidance provided here identifies 60-inch wide clear floor space as part of accessible maneuvering conditions adjacent to the toilet in relation to sidewall positioning, noted in the earlier source summary on ADA toilet requirements. In practical design review, I treat clear space as active operating room, not leftover floor.
Two acceptable turning approaches
A restroom needs a turning area that allows a wheelchair user to reorient independently. The standards recognize two common approaches:
- A 60-inch diameter turning space
- A T-shaped turning space
Both approaches serve the same goal. They allow a user to enter, turn, approach fixtures, and exit without getting trapped by partitions, door swings, or accessories.
What interferes with clear floor space
The most common field issue isn’t the original plan. It’s what gets added later.
- Accessories in the wrong place: Dispensers, waste bins, and baby changing units often creep into maneuvering zones.
- Door swing conflicts: A compliant stall can still become awkward if the door consumes needed approach space.
- Maintenance additions: Temporary storage, cleaning equipment, and liner carts often end up where turning space is supposed to remain open.
Clear floor space has to stay clear after turnover, not just at final inspection.
For architects and project managers, that’s the discipline: review the restroom in use, not just in elevation. A room that technically contains the right fixtures can still fail the user if circulation is pinched where the transfer needs to happen.
Grab Bar Placement and Specifications
Grab bars are the part of an accessible toilet compartment that gets tested in the most direct way. During a lateral transfer, a user may put substantial body weight through one hand while lowering, shifting, or standing. If the bar is even slightly misplaced, hard to grasp, or weakly anchored, the stall can meet a drawing note and still fail the person using it.
The 2010 ADA Standards for Accessible Design require grab bars to be mounted 33 to 36 inches above the finished floor and to resist 250 pounds of force. Those baseline requirements are easy to list. The harder part is building them so they still work after tile, accessories, and field adjustments are finished.
What placement gets right
Grab bar placement matters because it supports a sequence of movement, not a static posture. The user reaches, stabilizes, transfers, repositions, and pushes back up. The side wall bar and rear wall bar need to support that sequence where the body moves, not where the elevation looks balanced.
That is why field dimensions matter more than visual centering. Installers sometimes shift bars to align with grout joints, partition lines, or accessory layouts. That small adjustment can put the gripping surface in the wrong place relative to the toilet and reduce the user's control during transfer.
Common failures I see in plan review and punch walks
- Accessories crowd the grab bar. Toilet paper dispensers, soap units, and other projections often end up where a full hand grip should be.
- Backing was not coordinated early. The wall finish is complete, but the substrate was never prepared for the required load.
- Bars are dimensioned from the wrong reference point. Teams measure from a partition face or finish edge instead of the required fixture relationship.
- Product substitutions change the usable grip. A bar may meet nominal size requirements but still create clearance problems at flanges or returns.
One bad detail can create a correction that is expensive and visible.
How to inspect grab bars without missing the real problem
Use a short field checklist:
- Measure mounting height from the finished floor. Do not accept rough framing dimensions or shop drawing assumptions.
- Confirm the bar location relative to the toilet. The toilet sets the working geometry.
- Check gripping clearance along the bar. A user needs room for the hand, not just room for the bar to exist.
- Verify structural support. Grab bars are safety hardware, not finish accessories.
- Review adjacent accessories after installation. A compliant bar can become unusable once dispensers or bins are added.
The practical mistake is leaving grab bars to the end of the job. By then, partitions are set, tile is complete, backing conflicts are hidden, and accessory locations have already consumed the usable wall area. Coordinate them early, dimension them from the toilet, and inspect them in the finished condition the user will encounter.
Wheelchair Accessible Stall Layouts
A wheelchair-accessible stall only works when the geometry works together. Toilet placement, grab bars, maneuvering room, partitions, and the door all depend on one another. You can’t solve them independently and expect the finished stall to perform well.
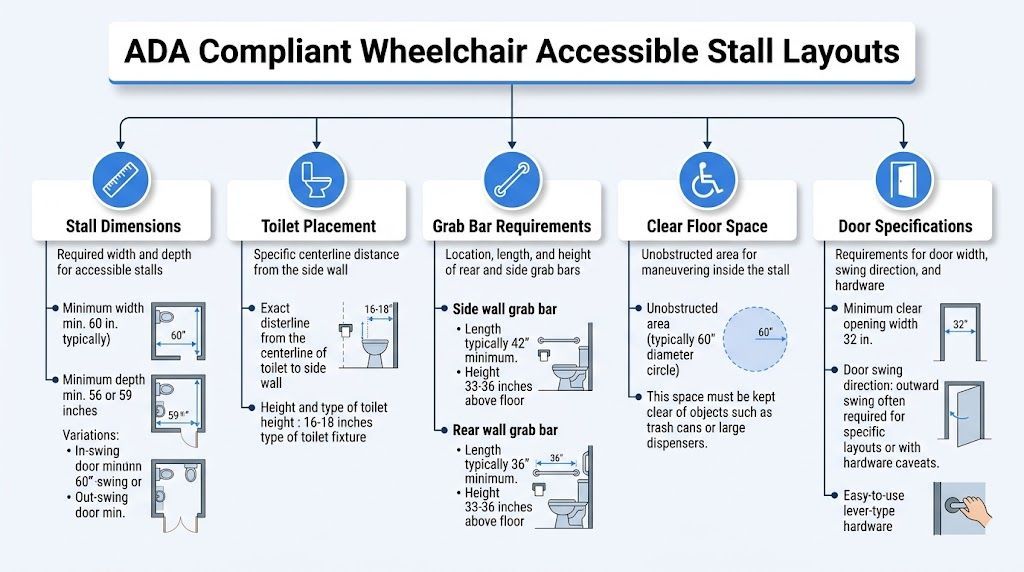
The most useful way to review a stall is to stand in the doorway and trace the user path. Can a person enter, close the door, turn or reposition, approach the toilet, transfer, reach supports, and exit without awkward backtracking? If not, the stall may satisfy isolated notes while still failing in real use.
What a coordinated stall does right
A good accessible stall has these qualities:
- The toilet sits exactly where the transfer expects it
- Grab bars reinforce the transfer path instead of competing with it
- Open floor area remains usable after accessories are installed
- The door doesn’t create a new barrier inside the stall
The layout needs to feel intentional. When it doesn’t, the problem usually shows up as a door conflict, an accessory collision, or a fixture installed on the wrong reference line.
A visual review helps catch those relationships before field correction becomes expensive:
What does not work
Three layouts repeatedly cause trouble:
- The cramped retrofit stall: The fixture technically fits, but there’s no practical transfer room.
- The over-accessorized stall: Hooks, dispensers, and bins consume the space the user needs.
- The partition-driven layout: The partition package dictates dimensions instead of accessibility requirements dictating the partition package.
That last one matters. I’ve seen teams accept stock partition modules and then try to force compliant fixture placement into them. It rarely ends well. In accessible restroom design, the stall geometry should lead, and products should follow.
Ambulatory Accessible Stall Requirements
An ambulatory accessible stall serves a different user than a wheelchair-accessible stall. It’s designed for people who walk but need support, often because they use crutches, canes, or a walker. That changes how the toilet relates to the side wall and how the support bars need to function.
The verified design conflict is real. Ambulatory accessible stalls require a toilet centerline of 17 to 19 inches from the side wall, while wheelchair-accessible compartments require 16 to 18 inches, and existing guides don’t provide a practical decision framework for mixed-use layouts, as noted by One Point Partitions’ ADA bathroom design layout article.
Why the conflict matters
On paper, those ranges look close. In layout coordination, they aren’t. That difference affects wall relationships, support placement, and available room inside a compartment. If a facility needs both stall types, the project team has to decide that early.
What doesn’t work is assuming one “middle” layout will satisfy all users equally well. Existing guidance in the source material doesn’t establish a universal compromise dimension or a cost-based rule for choosing one over the other.
Practical decision approach
When both needs exist in the same facility, these principles help:
- Provide separate stall types when possible: That preserves the function of each.
- Decide during planning, not after rough-in: Plumbing and partition coordination get harder once fixed.
- Review user mix and building constraints qualitatively: The source material identifies the design gap, so teams need project-specific judgment rather than invented rules.
This is one of those areas where code reading alone won’t resolve the design problem. You need an accessibility-minded layout review that respects the distinct purpose of each stall type instead of flattening them into one generic accessible option.
Restroom Sinks Faucets and Mirrors
A restroom isn’t accessible just because the stall is compliant. Users still need to wash hands, reach controls, and use the mirror without awkward body positioning or assistance.
The practical challenge with sinks, faucets, and mirrors is that they’re often handled late by interiors, plumbing, and accessory vendors working from separate submittals. That’s where a clean drawing can turn into a cluttered installation.
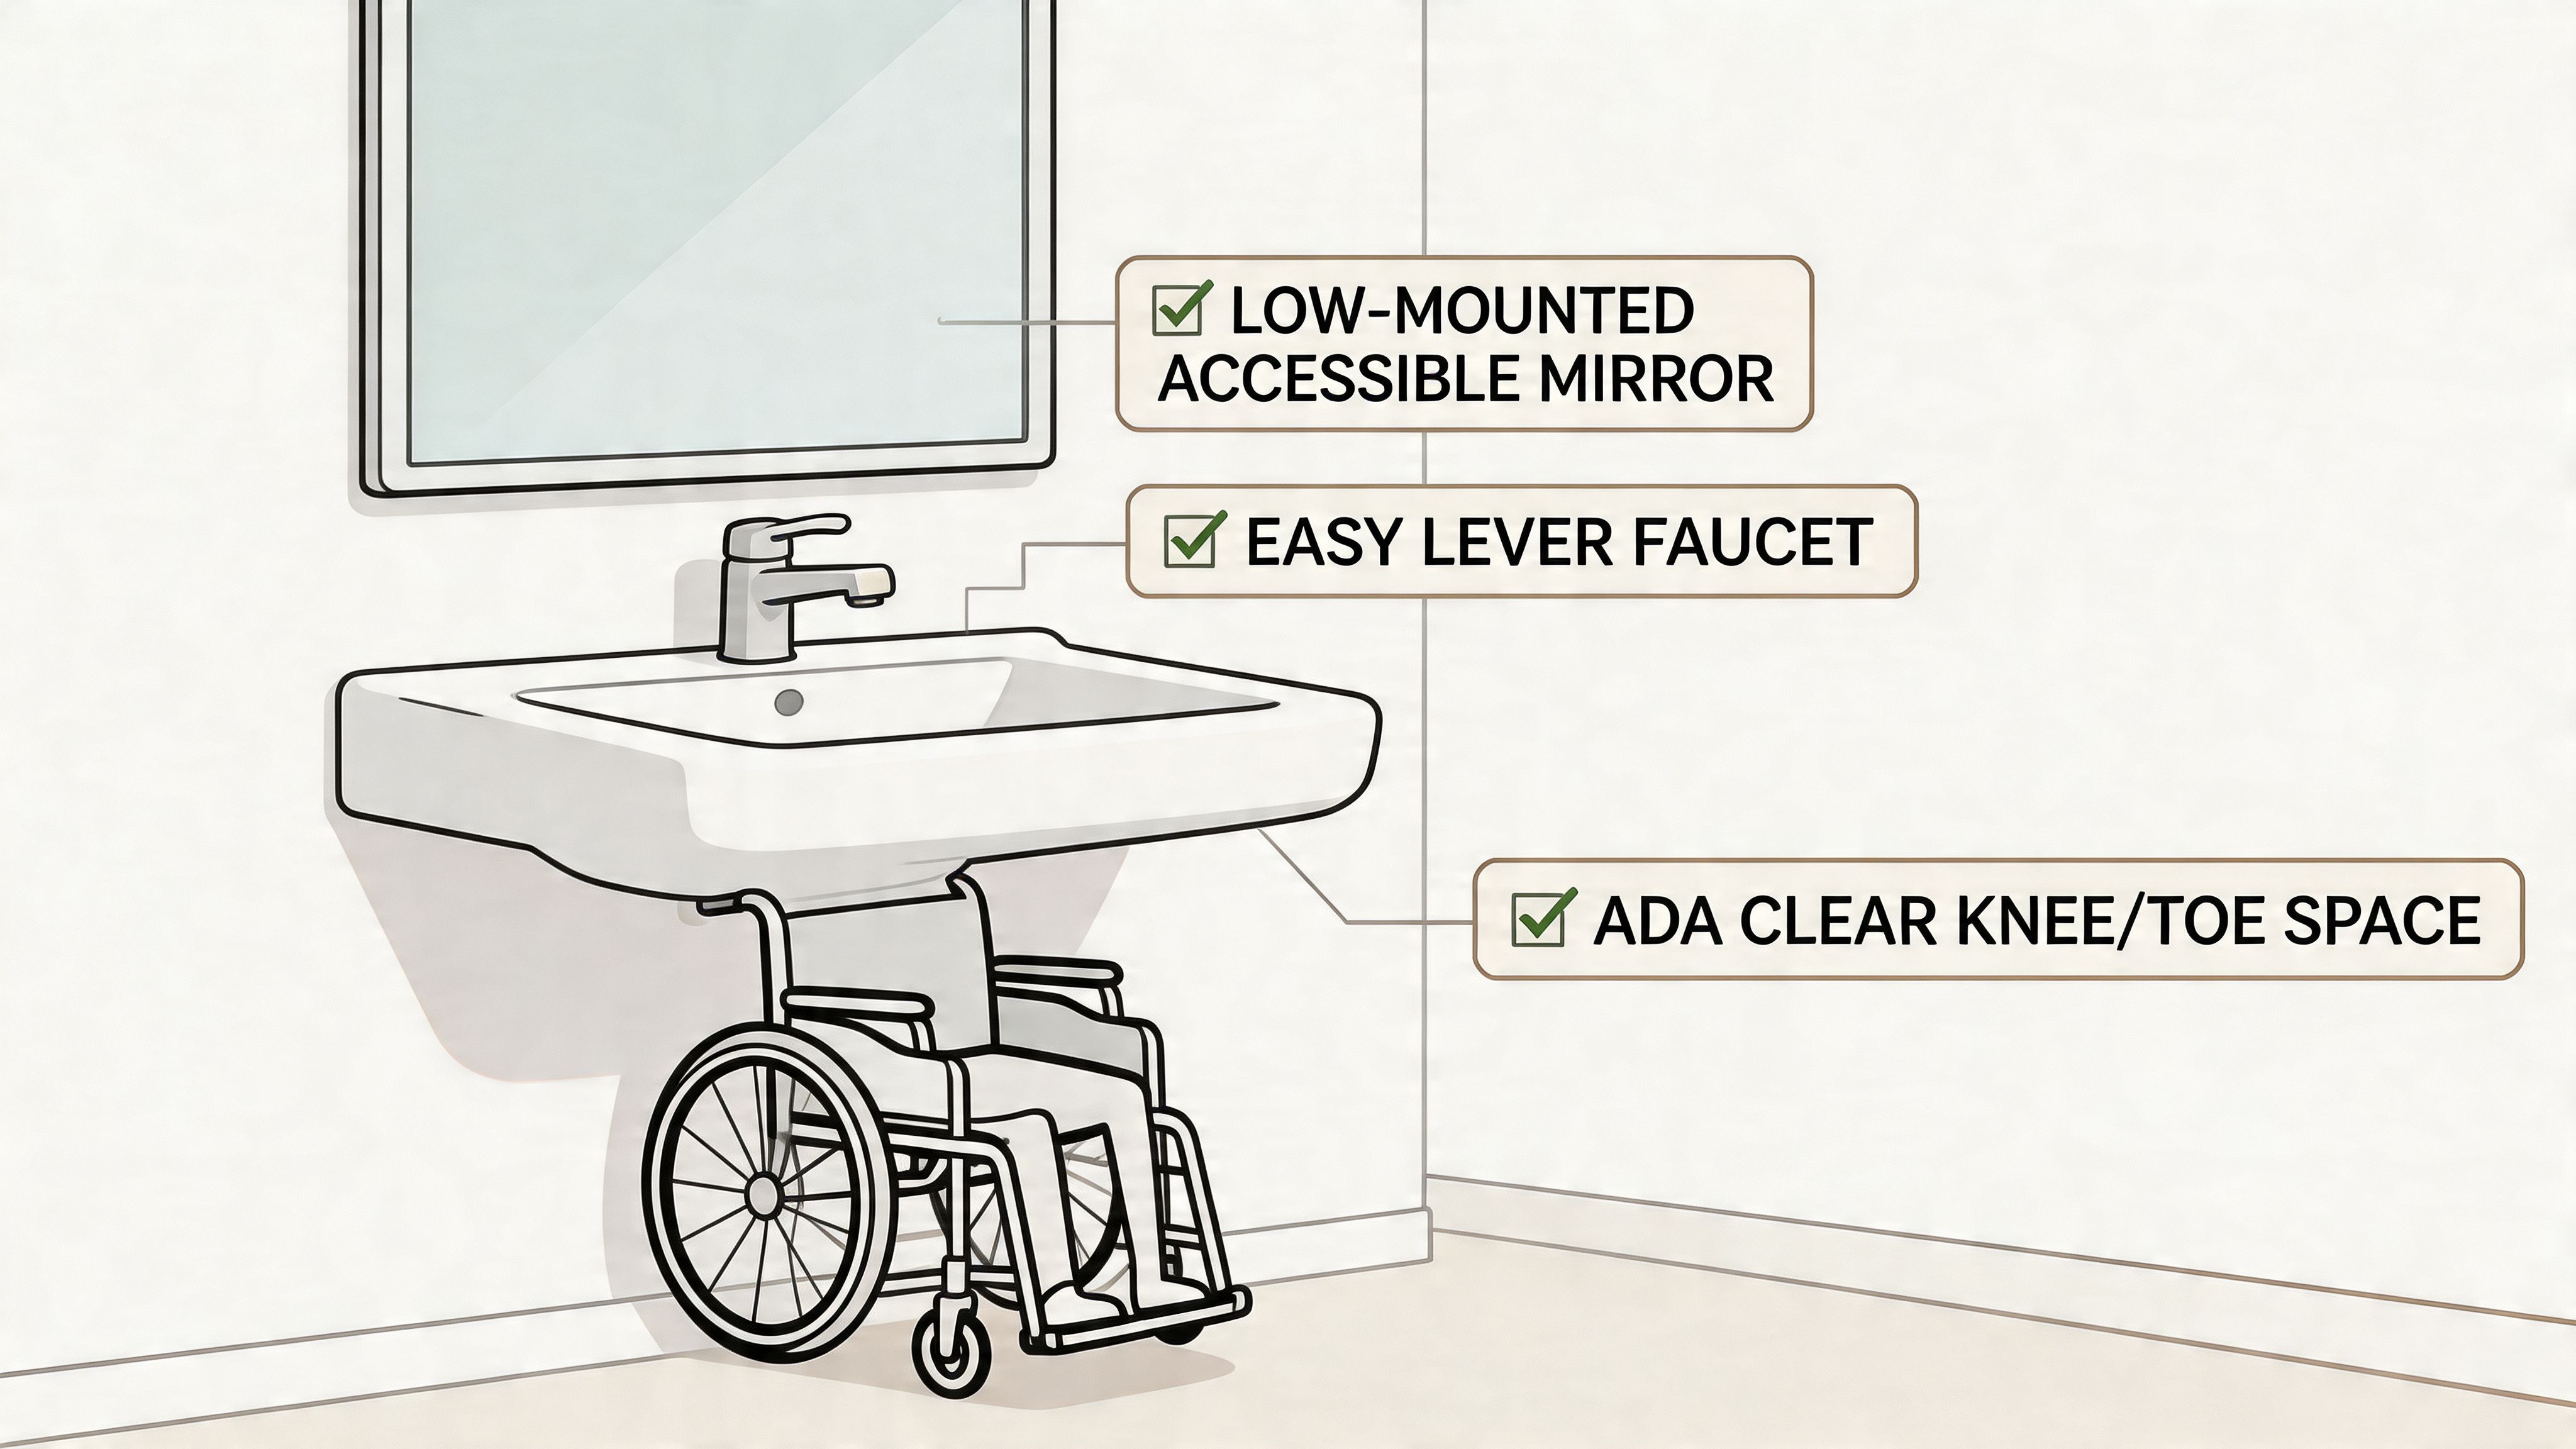
What to verify in the field
For the lavatory zone, focus on usability first:
- Approach space: A wheelchair user needs unobstructed room to get into position.
- Knee and toe room: The underside condition matters as much as the countertop.
- Faucet operation: Lever, sensor, or another easy-to-operate control is usually the safer choice.
- Mirror placement: The reflective area has to work for seated and standing users.
Where teams lose compliance
The sink area usually fails because of one of these conditions:
- Cabinetry or decorative panels remove usable knee space
- Exposed piping creates contact hazards
- Soap dispensers and hand dryers are mounted where users can’t comfortably reach them
- Trash bins end up parked in the clear floor area
If you want fewer surprises at final walkthrough, review the lavatory area after every accessory is installed, not before.
That final check matters because sink compliance is rarely defeated by the sink alone. It’s defeated by the accumulation of small decisions around it. In practice, the accessible lavatory should be treated as an operating zone, not as a countertop specification.
Doors and Pathways in Accessible Restrooms
The restroom has to be accessible before anyone reaches the toilet. If the entry door is hard to operate or the circulation path narrows at the wrong point, the rest of the room becomes irrelevant.
Door review is where many teams discover that fixture compliance doesn’t solve route compliance. A well-laid-out stall can still sit behind a difficult entry sequence.
What to look for at the entrance
A practical door review includes:
- Clear opening width
- Maneuvering space on approach
- Hardware that can be used without awkward hand action
- Thresholds and transitions that don’t impede rolling access
If your team needs a plain-language refresher on wheelchair door width requirements, that resource helps frame the entry problem before you layer in restroom-specific maneuvering conditions.
Pathways inside the room
Inside the restroom, circulation should feel direct. Users shouldn’t have to weave around accessory clusters, door swings, or cleaning storage to reach the accessible stall or lavatory.
The layouts that work best usually share two habits:
- They keep the accessible route obvious
- They protect maneuvering space from later operational creep
That second point is where facility teams need discipline. Even when the construction is right, operations can erode accessibility over time. A pathway blocked by supply carts or extra bins is still a barrier. Accessibility has to remain part of how the room is maintained, not just how it was designed.
Common ADA Compliance Pitfalls to Avoid
A restroom can look compliant on a plan review and still fail in the field. The failures I see most often come from treating product labels, standard details, or past project templates as substitutes for measurement.
The market term comfort height is a prime example. ADA requires the toilet seat to land within the specified range after installation. A manufacturer label does not confirm the final seat height, and it says nothing about centerline, clearances, or how the fixture works with the rest of the stall. The practical question is simple. Can a person use the room as intended, with the dimensions as built?
The label problem
A toilet marketed as “ADA” or “comfort height” still needs field verification. I advise teams to check the installed condition, not the catalog page. Finished floor thickness, seat selection, carrier adjustment, and wall finish can all shift the result enough to create a violation.
That distinction matters on renovation work. A fixture package may look safe during submittals, then miss compliance once the room is built around existing walls, chases, and partition constraints.
Other costly mistakes
These issues repeatedly show up during punch walks and post-installation corrections:
- Checking dimensions before finishes are complete: Final tile, base, and partitions affect the actual measurement.
- Treating one compliant fixture as proof the whole room passes: A correct toilet does not fix conflicts with grab bars, controls, or adjacent accessories.
- Placing accessories inside required use zones: A dispenser or receptacle can make a compliant grab bar unusable.
- Ignoring retrofit conflicts until the end: Existing plumbing locations often push teams into tight layouts that need a full compliance review, not a quick assumption.
- Approving borderline conditions to save schedule: That decision often costs more later in rework, delay, and exposure. Teams weighing that risk should review the cost of ADA non-compliance: legal and financial risks.
What works better than product shorthand
Use a simple review order:
| Review priority | What to trust |
|---|---|
| First | Installed dimensions |
| Second | Coordinated drawings |
| Third | Manufacturer submittals |
| Last | Marketing labels |
That order keeps the team focused on compliance in the built room, not compliance by assumption. It also ties the numbers back to the reason they exist. A restroom only works if a person can approach, transfer, reach, and use the fixtures without unnecessary difficulty.
Your Practical ADA Restroom Compliance Checklist
The most effective restroom reviews happen with a tape measure in hand and a short checklist, not with assumptions. Use this as a field verification tool during rough-in review, fixture installation, and final punch.
For a more complete compliance workflow, many teams also keep an ADA compliance checklist alongside their drawing set so physical reviews and organizational governance stay aligned.
ADA Restroom Quick Reference Dimensions
| Element | Requirement | Dimension / Spec |
|---|---|---|
| Toilet seat | Height above finished floor | 17 to 19 inches |
| Toilet location | Centerline from side wall or partition | 16 to 18 inches |
| Clear maneuvering space | Turning option | 60-inch turning space or T-shaped turn |
| Clear floor space by toilet | Maneuvering condition | 60-inch wide clear floor space |
| Grab bars | Mounting height | 33 to 36 inches |
| Grab bars | Structural performance | Withstand 250 pounds |
| Ambulatory stall toilet | Centerline from side wall | 17 to 19 inches |
How to use the checklist well
- Check finished conditions: Don’t sign off from framing or rough dimensions alone.
- Verify the whole user path: Entry, route, stall, and lavatory all matter.
- Review conflicts at the end: Accessories and operations often create the final failure.
- Document exceptions immediately: Small deviations become expensive when they’re discovered after turnover.
A good checklist won’t replace judgment, but it will keep obvious misses from becoming change orders.
Beyond the Code Understanding the Human Impact
The best way to understand ada toilet dimensions is to stop thinking of them as abstract compliance math. Every one of these measurements affects whether someone can use the restroom privately, safely, and without delay.
A correctly positioned toilet supports transfer. Clear floor space preserves maneuvering choice. A properly installed grab bar gives stability at the moment it’s needed most. Those outcomes are about dignity just as much as they are about code.
Accessibility is experienced, not just documented
Project teams often focus on whether the restroom can pass inspection. Users focus on whether it works without stress. Those are related, but they aren’t identical. A room that barely meets technical intent can still feel difficult in use if coordination was sloppy or operational clutter has crept in.
That’s why strong accessibility practice looks beyond minimum notes. It asks whether the environment supports independent use in a calm, predictable way.
Accessible design is at its best when the user doesn’t have to negotiate with the room.
This is also why accessibility work shouldn’t stop at the physical facility. The same principle applies online. People need equal access to information, transactions, navigation, and support across both spaces. Good organizations recognize that consistency and build for it across the full customer experience.
Frequently Asked Questions on Toilet Dimensions
Does buying an ADA toilet guarantee compliance
No. The product has to be installed at the right height and in the right location within a compliant layout. The label doesn’t guarantee the built condition.
What is the most important measurement to verify first
Start with the toilet seat height and centerline from the side wall. If those are wrong, the stall often needs broader correction.
Can one stall satisfy both wheelchair and ambulatory requirements
The verified source material identifies a conflict between the centerline requirements for those stall types and does not provide a universal compromise method. In practice, teams should evaluate whether separate compliant stall types are needed.
Why does finished floor matter so much
Because the standards rely on installed conditions. Measuring before floor finish, wall finish, or seat installation can produce the wrong final result.
Is comfort height the same as ADA compliant
Not necessarily. The source material notes that the terminology isn’t standardized well enough to treat the label as proof. Verify the installed measurement instead.
What usually causes the last-minute inspection failure
Small coordination mistakes. Common examples include wrong reference measurements, accessories blocking usable space, and door or partition conflicts that weren’t obvious until installation was complete.
Should project managers check dimensions themselves
Yes. Even with a strong architect and contractor, accessibility is important enough to verify independently during layout, rough-in, and final punch.
If your organization is working to improve accessibility across both physical and digital environments, WebAbility.io offers tools and expert support to help teams move toward sustained compliance with confidence.
Quick Questions
Tap to ask AI about this article