Loading
Need some help with installing WebAbility?
Find your answers here
How to Install WebAbility Widget on Shopify
Before You Begin
Installing WebAbility on your Shopify store takes about 5 minutes and requires no technical expertise. However, having the right permissions and knowing where to look will save you time.
What you'll need:
- Admin access to your Shopify store
- Your WebAbility widget code (get it from your WebAbility dashboard)
- 5 minutes of uninterrupted time (seriously, it's that quick)
Compatibility:
WebAbility works with all Shopify themes and plans, including:
- Shopify Lite, Basic, Shopify, and Advanced plans
- All 2.0 themes (Dawn, Craft, Studio, etc.)
- Legacy vintage themes
- Custom themes
- Shopify Plus stores with multiple themes
Why Shopify Stores Need Accessibility
Your Shopify store isn't just a business – it's a digital storefront that should welcome everyone. Here's what's at stake:
Legal Requirements:
E-commerce sites are considered places of public accommodation under the ADA. Shopify stores have been targets of accessibility lawsuits, especially in retail, fashion, and consumer goods sectors.
Business Impact:
- 71% of users with disabilities will leave an inaccessible website immediately
- Accessible sites see 12% better conversion rates on average
- Cart abandonment drops by 20% when checkout is accessible
- SEO improvements from proper semantic structure
Common Shopify Accessibility Issues:
- Product images without descriptions
- Color swatches that rely only on color
- Checkout forms without proper labels
- Pop-ups that trap keyboard users
- Video content without captions
- Carousel sliders that can't be paused
WebAbility addresses all these issues automatically, without requiring theme modifications.
Step-by-Step Installation
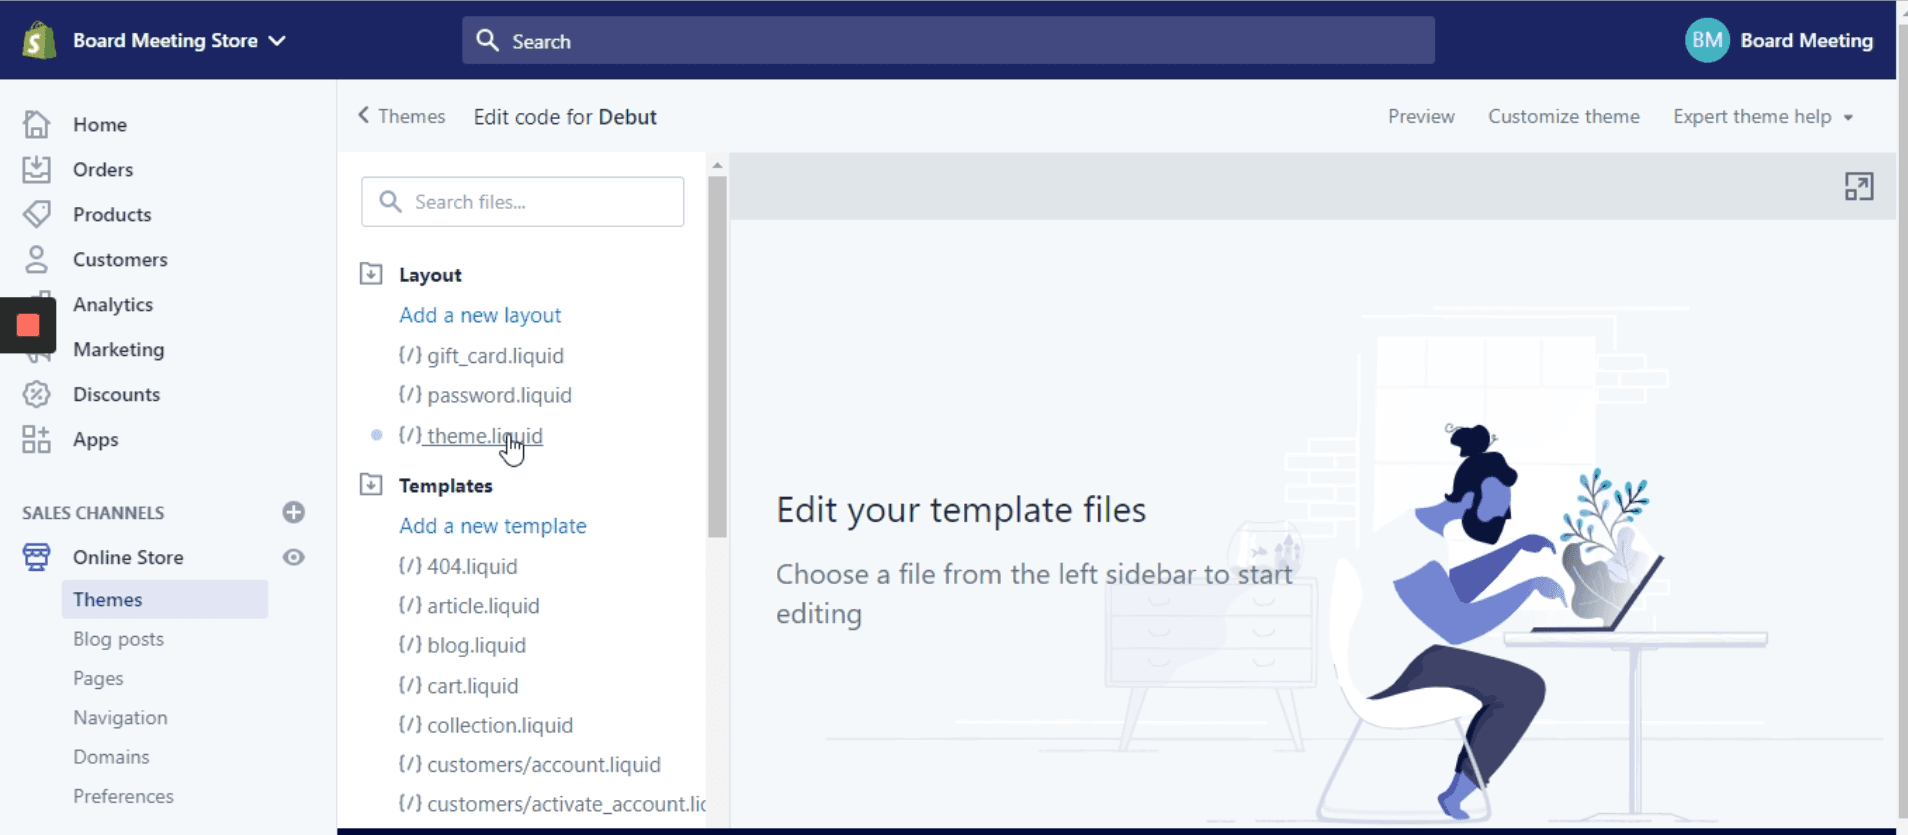
- Go to your Shopify admin site
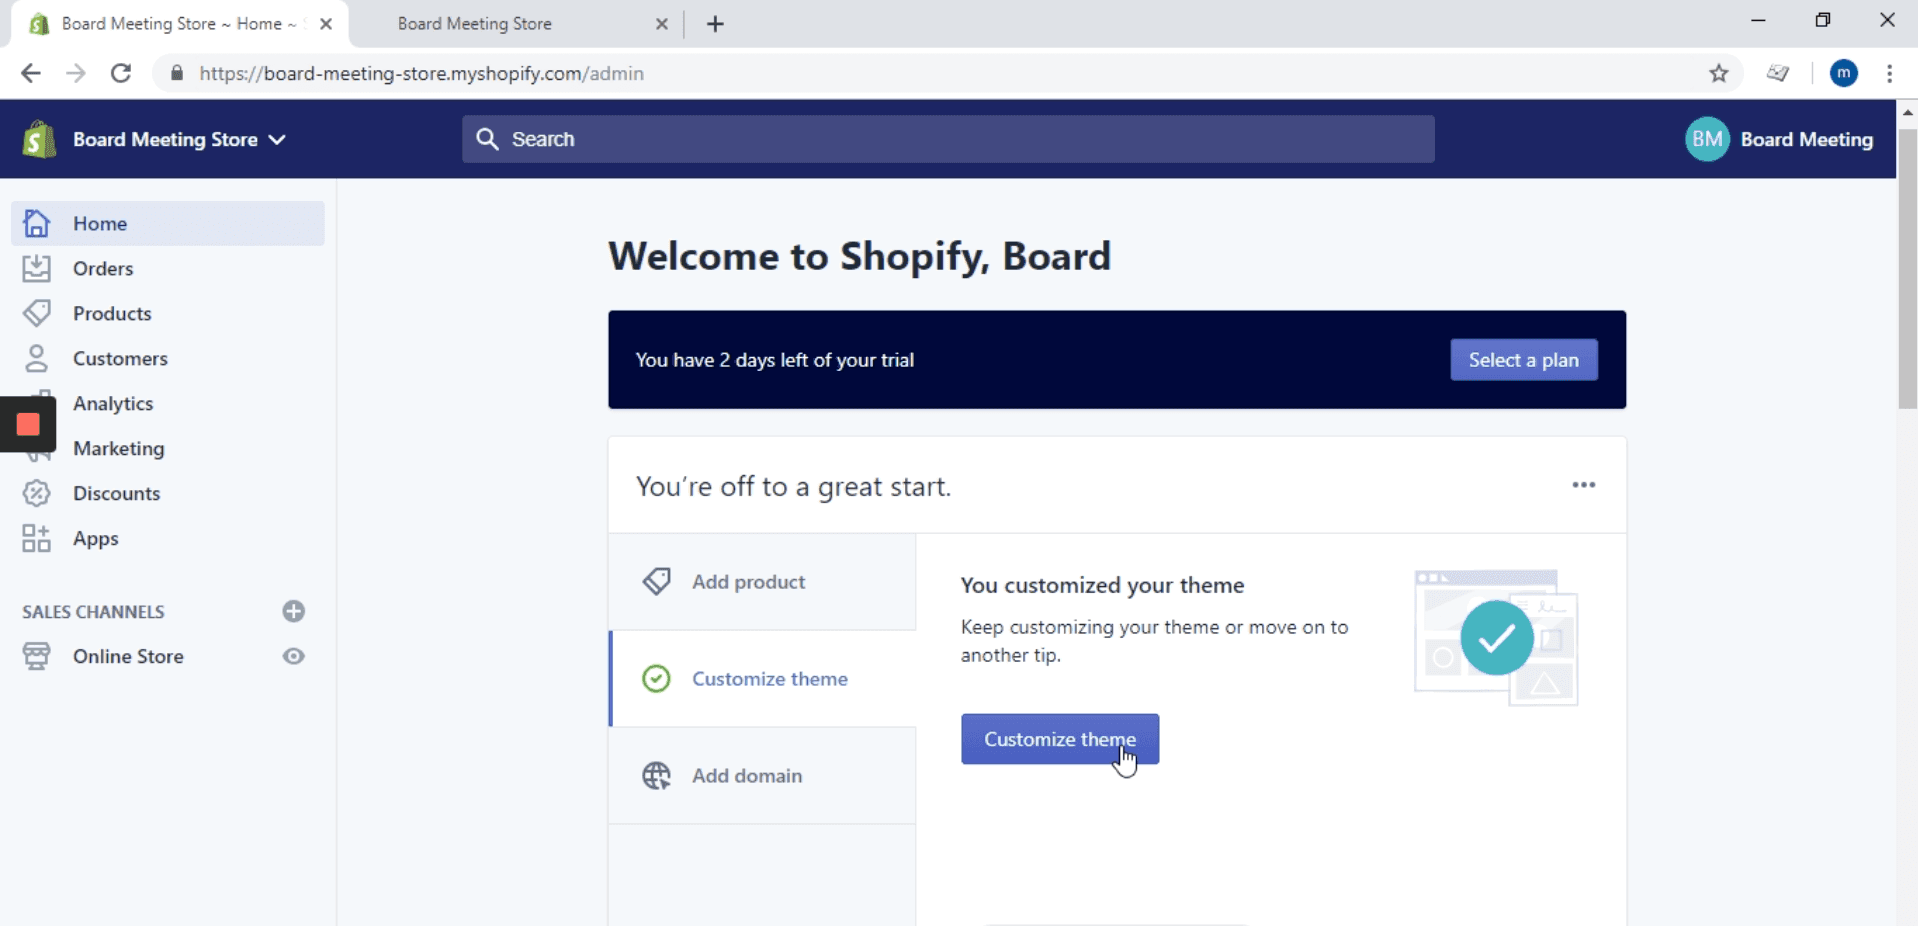
- Click on Customize
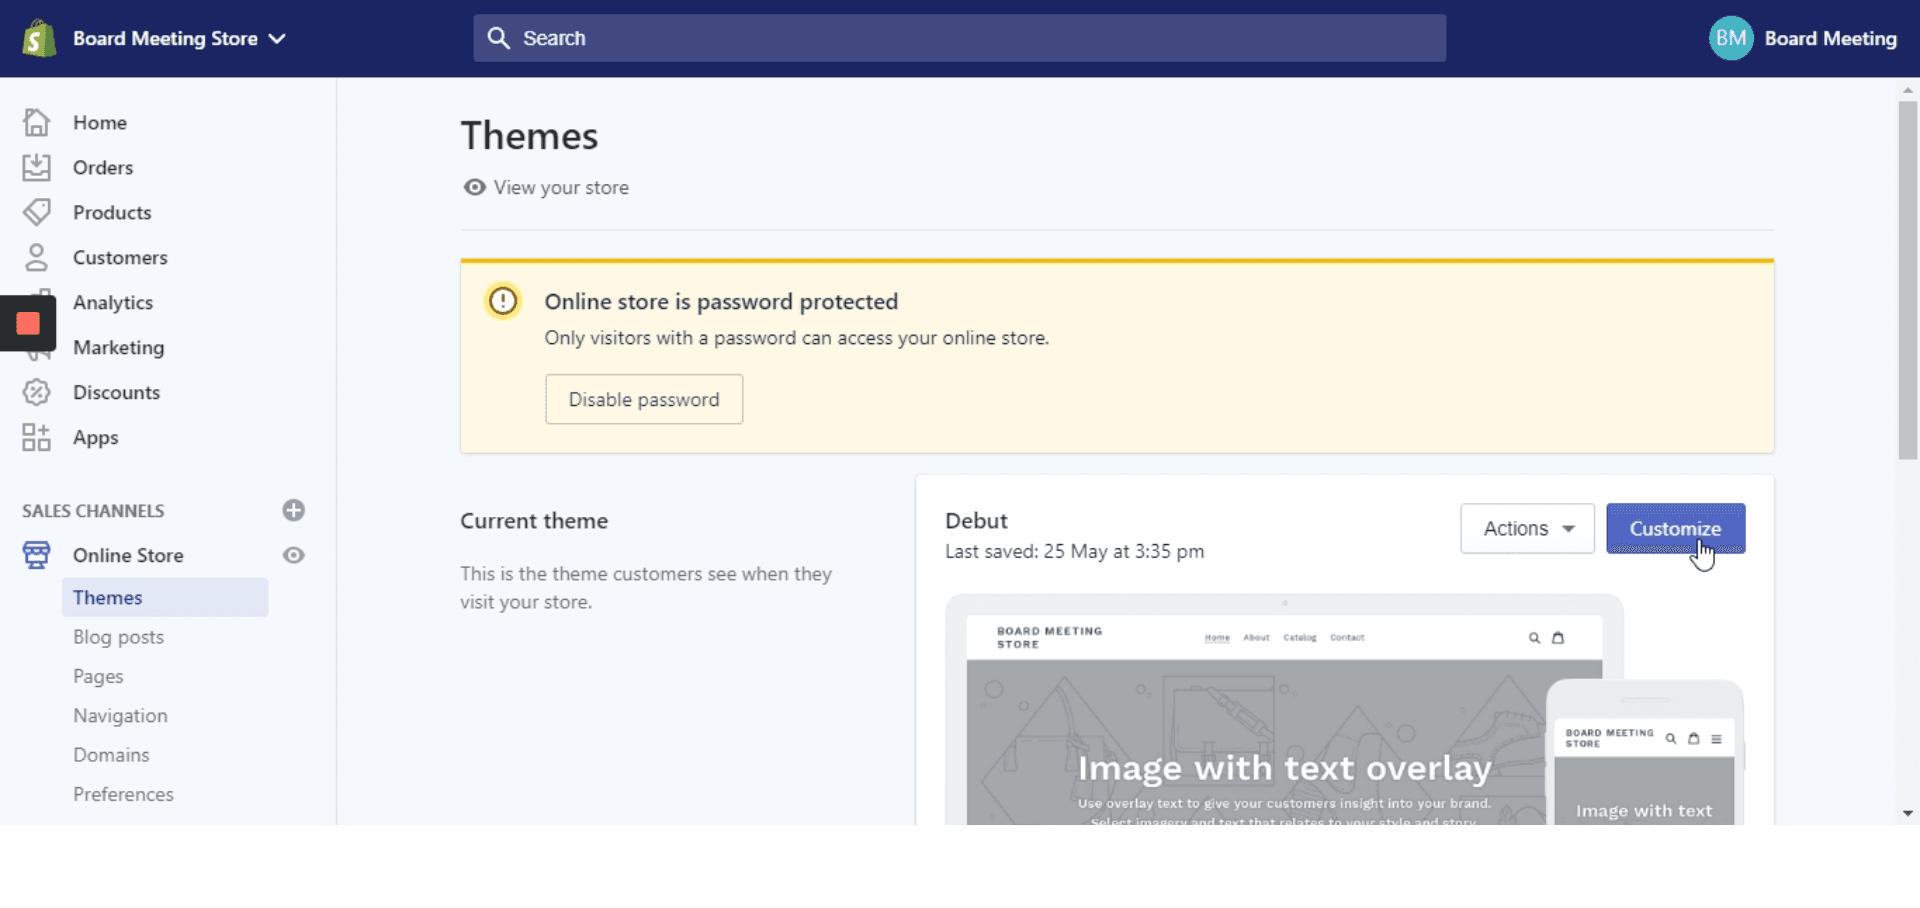
- Click on Edit code
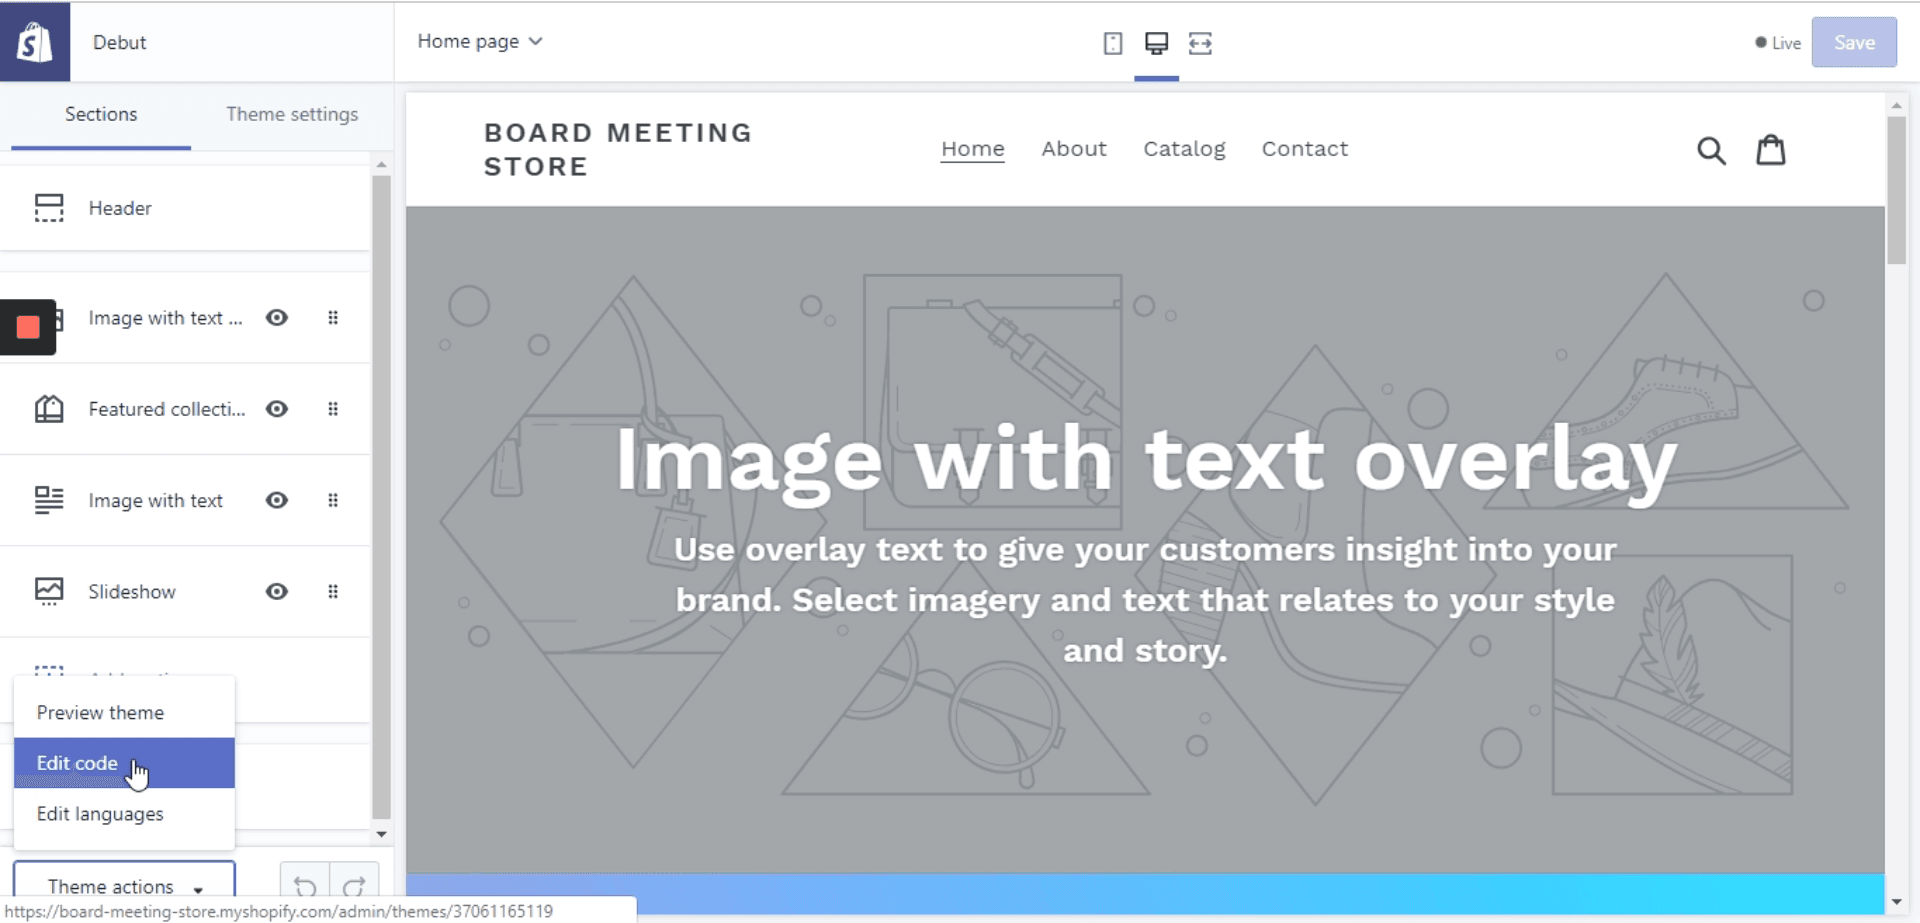
- Click on {/} theme.liquid
- Find the </body> section
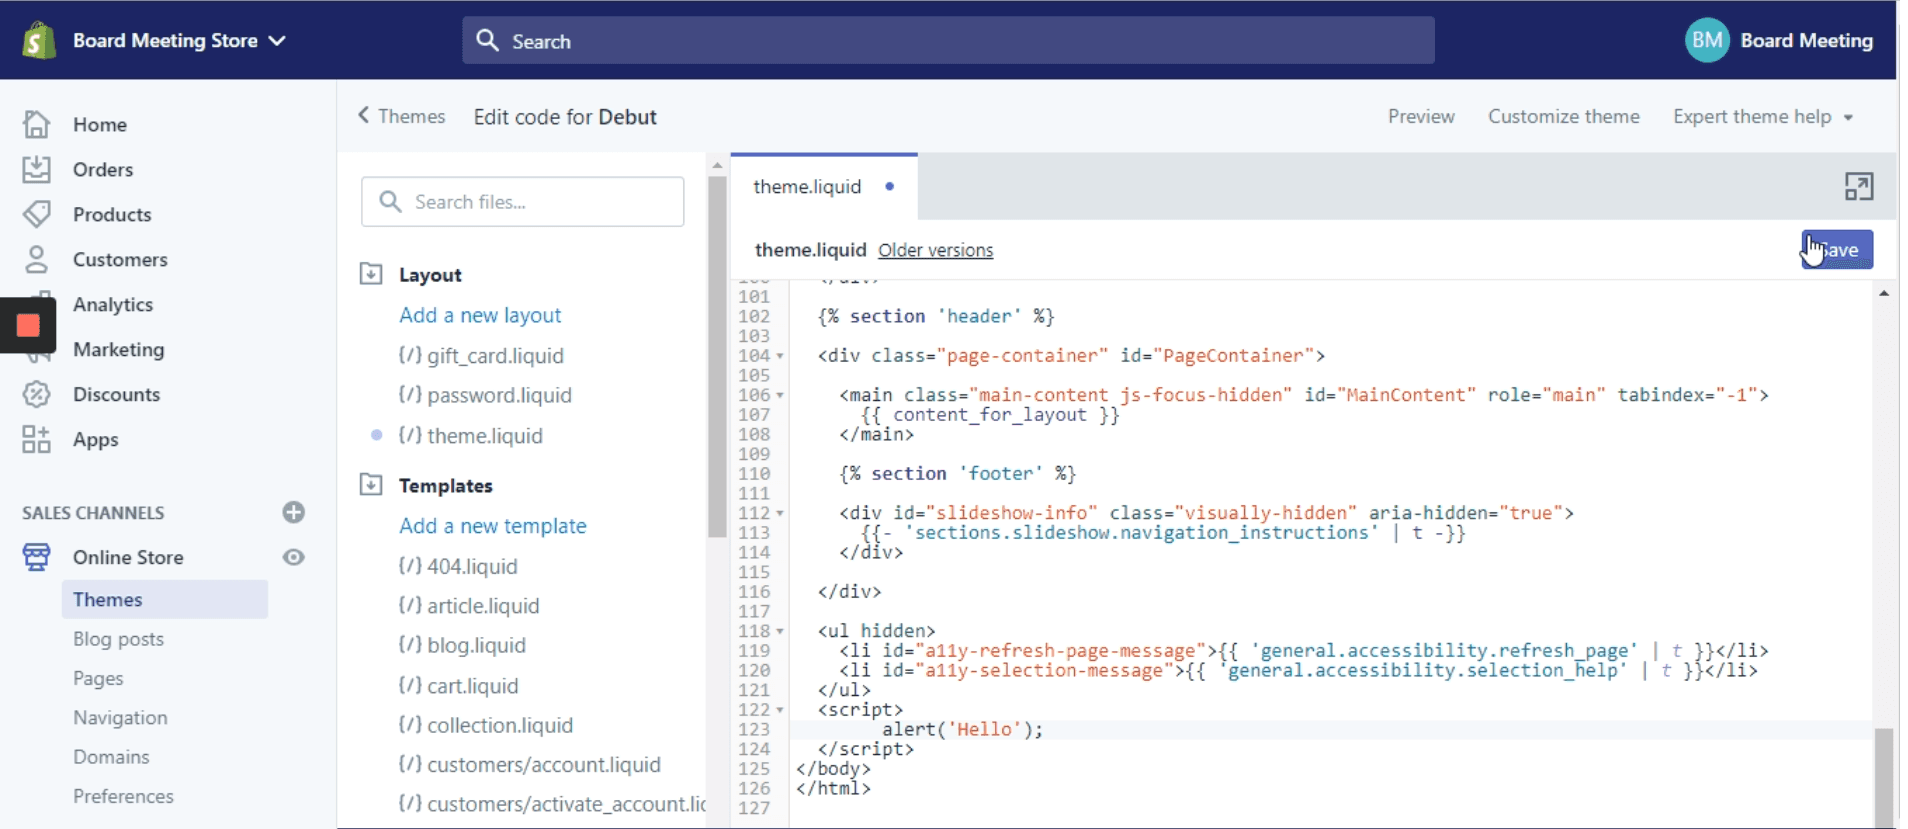
- Add your WebAbility widget code just above the </body> tag:
<script> // WebAbility widget initialization (function() { var script = document.createElement('script'); script.src = 'https://widget-v2.webability.io/widget.min.js'; script.async = true; document.head.appendChild(script); })(); </script> - Click Save and refresh your site to see the widget appear
Success! You've successfully installed the WebAbility widget, making your Shopify store accessible to all visitors.
Installation Methods
Method 1: Theme Editor (Recommended) Best for: Most users Time: 3-5 minutes Technical skill: None required
This method adds WebAbility directly to your theme's code. It's permanent, works across all pages, and survives app updates.
Method 2: Custom Liquid Section Best for: Shopify Plus users with multiple themes Time: 10 minutes Technical skill: Basic
Create a reusable section that can be added to any theme without editing core files.
Method 3: Google Tag Manager Best for: Stores already using GTM Time: 5 minutes Technical skill: Basic
If you're already using GTM for analytics, add WebAbility as a custom HTML tag.
Method 4: Shopify ScriptTag API Best for: Developers managing multiple stores Time: 15 minutes Technical skill: Advanced
Programmatically inject the widget using Shopify's API.
Theme-Specific Instructions
Different Shopify themes have slightly different structures. Here's where to add the WebAbility code for popular themes:
Dawn (Shopify's flagship theme):
- File: layout/theme.liquid
- Location: Before </body> tag
- Note: Works with all Dawn versions
Debut:
- File: layout/theme.liquid
- Location: Before </body> tag
- Note: Legacy theme but still widely used
Brooklyn:
- File: layout/theme.liquid
- Location: After {{ content_for_layout }}
Minimal:
- File: layout/theme.liquid
- Location: Before </body> tag
Custom Themes: Look for the main layout file (usually theme.liquid or base.liquid). The WebAbility code should go just before the closing </body> tag.
Can't find theme.liquid? Some newer themes use different structures:
- Try: layout/base.liquid
- Or: layout/password.liquid (for password-protected stores)
- Or: Contact our support for theme-specific help
Troubleshooting Common Issues
"Liquid error: Could not find asset"
What you see: Red error message in your theme after adding code Cause: You accidentally deleted a closing bracket or quote Fix: Remove the WebAbility code, save, then re-add it carefully. Make sure you're pasting AFTER the last Shopify liquid tag but BEFORE </body>
"This action requires recent authentication"
What happens: Shopify won't let you save theme.liquid Cause: Security timeout - Shopify requires re-authentication for code changes Fix: Log out of Shopify admin completely, log back in, then try again. If using 2FA, you'll need to re-authenticate.
Widget appears but shows "License Invalid"
What you see: Widget loads but displays error message Cause: Using wrong widget code or domain mismatch Fix:
- Get your unique code from WebAbility dashboard > Installation
- Verify your Shopify domain matches what's registered in WebAbility
- If using multiple domains (.com, .ca, etc.), contact support to add them
"Content Security Policy directive" console error
What you see: Error in browser console, widget doesn't load Cause: Your theme or an app has strict CSP headers Fix: Add widget.webability.io to your CSP whitelist:
- Find Content-Security-Policy meta tag in theme.liquid
- Add https://widget.webability.io to script-src
- Or contact support for CSP bypass code
Widget loads on desktop but not mobile (or vice versa)
Symptoms: Inconsistent appearance across devices Cause: Theme has separate mobile/desktop templates Fix:
- Check for theme.liquid AND theme.mobile.liquid
- Add code to BOTH files
- For responsive themes, ensure code isn't inside {% if mobile %} blocks
"429 Too Many Requests" error
What you see: Widget intermittently fails to load Cause: Rate limiting from too many initialization attempts Fix: You likely have the code added multiple times:
- Search theme.liquid for "webability"
- Remove duplicate instances
- Keep only ONE instance before </body>
Changes not showing after saving
What happens: You save but nothing changes on live site Common causes & fixes:
- Wrong theme: Go to Online Store > Themes, ensure you're editing the "Current theme"
- Cache issues: Use incognito/private browsing to test
- CDN delay: Wait 2-3 minutes, Shopify's CDN needs time
- Preview vs Live: Make sure you're checking the actual live site, not preview
Shopify-Specific Features
WebAbility automatically enhances Shopify-specific elements:
Product Pages:
- Alt text for product images generated from product titles and descriptions
- Size/color variant announcements for screen readers
- "Add to Cart" button states (enabled/disabled/loading)
- Price change announcements when variants selected
- Stock level announcements
Collection Pages:
- Filter announcements when applied/removed
- Sort order changes announced
- Product count updates
- Grid/list view toggle accessibility
Cart & Checkout:
- Cart item quantity changes announced
- Removal confirmations
- Error message associations with form fields
- Required field indicators
- Auto-complete compatibility
Shopify Apps Compatibility: WebAbility works with popular Shopify apps: ✓ ReCharge (subscriptions) ✓ Bold Product Options ✓ Klaviyo (email pop-ups) ✓ Yotpo (reviews) ✓ Privy (pop-ups) ✓ SearchSpring (search)
If you encounter issues with specific apps, our team can create custom configurations.
Post-Installation Checklist
Once installed, verify everything's working:
Quick Tests: □ Widget appears in bottom corner of your site □ Click widget to open accessibility menu □ Try adjusting text size - changes should apply immediately □ Navigate with Tab key - focus indicators should be visible □ Test on product page, collection page, and cart
Configuration Options: Access your WebAbility dashboard to:
- Customize widget position (left/right)
- Change widget color to match your brand
- Set default language
- Enable/disable specific features
- View accessibility analytics
Performance Verification:
- Run Google PageSpeed Insights before and after
- Check Core Web Vitals in Search Console
- Monitor conversion rates in Shopify Analytics
Next Steps:
- Run a free accessibility scan from your WebAbility dashboard
- Review automatically generated accessibility statement
- Set up weekly monitoring reports
- Train your team on accessibility best practices
Need Help?
- 24/7 Support: [email protected]
- Live chat available in your dashboard
- Shopify-specific documentation: docs.webability.io/shopify
- Video tutorials in your account
Remember: Installation is just the beginning. WebAbility continuously monitors and improves your store's accessibility as you add new products and content.
Frequently Asked Questions
Common questions about Shopify installation
Always use the very last </body> tag in the file – it's usually near the bottom, after all the Shopify liquid tags like {{ 'section-footer.css' | asset_url | stylesheet_tag }}. If you see multiple </body> tags in comments or strings, ignore those. The real one will be on its own line, typically between lines 300-500 of the file.
This usually happens when the code is placed in the wrong section. Some Shopify themes have separate desktop/mobile sections. Make sure you're adding the code to theme.liquid (which affects all devices), not to a desktop-only template. Also check if you have 'Mobile redirect' apps that might be interfering – WebAbility needs to load on your main mobile site, not a separate m.subdomain.
Both widgets default to the bottom-right corner. In your WebAbility dashboard, go to Widget Settings > Position and change it to bottom-left. The change takes effect immediately without needing to modify any code. If you're using multiple widgets, we recommend: WebAbility (bottom-left), Chat (bottom-right), Cookie banner (bottom-center).
Yes, WebAbility works seamlessly with Shopify Markets. The widget automatically detects the visitor's locale from Shopify's Liquid variables and displays in the appropriate language. Currency readers and region-specific content are properly announced. For stores using Shopify's native translation features, no additional configuration is needed.
WebAbility typically has minimal impact on speed scores (usually less than 2 points). The widget loads asynchronously after your page content, so it doesn't block the initial render. We've seen many stores actually improve their scores because WebAbility fixes semantic HTML issues that Lighthouse checks for. If you're concerned, run a before/after test using Shopify's Web Performance dashboard.
No special steps needed! Since WebAbility is added to theme.liquid, it automatically works on all pages including those built with page builders. The widget will even help make page builder content more accessible, as these tools often generate non-semantic HTML. Just ensure you're not adding the code within page builder blocks – keep it in theme.liquid only.
Keep Shopify's native accessibility features enabled! WebAbility complements rather than replaces them. Shopify's features handle basic things like skip links and some ARIA labels. WebAbility adds comprehensive enhancements that Shopify doesn't provide, like contrast adjustment, text spacing, font changes, and advanced screen reader optimization. They work together perfectly.
Need Help with Shopify Installation?
Our support team specializes in Shopify installations and can help you get set up in minutes.
Note: Whichever installation method you use, make sure to read ourWebsite Onboarding Guideand follow the instructions carefully to get WebAbility Widget set up right and running smoothly.