Your Guide to a Web Accessibility Audit

Sidharth Nayyar
TLDR:
A web accessibility audit is a comprehensive evaluation of your website against WCAG standards. It involves a mix of automated scans and manual testing with assistive technologies. The process includes defining the scope (e.g., WCAG 2.1 AA), testing key user flows, documenting all findings with clear evidence, and creating a prioritized plan to fix the issues. Regular audits are crucial for legal compliance, expanding your audience, and improving brand reputation.
A web accessibility audit is basically a deep-dive evaluation to see how well your website works for people with disabilities. It’s not just about ticking boxes; it's about benchmarking your site against established standards like the Web Content Accessibility Guidelines (WCAG).
Think of it as a crucial health check for your website. It’s essential for staying on the right side of the law, opening up your content to a much wider audience, and genuinely showing that your brand is committed to inclusivity.
Your Quick Guide to a Web Accessibility Audit
tldr; A solid web accessibility audit isn't just one thing—it’s a smart mix of automated scanning tools and hands-on, human testing. The whole process starts with defining a clear scope (like aiming for WCAG 2.1 AA compliance), then moves into testing the most critical user journeys on your site. From there, it's all about documenting every single finding with clear evidence and building a prioritized plan to fix the issues.
This flow chart gives you a bird's-eye view of how a typical audit project breaks down.
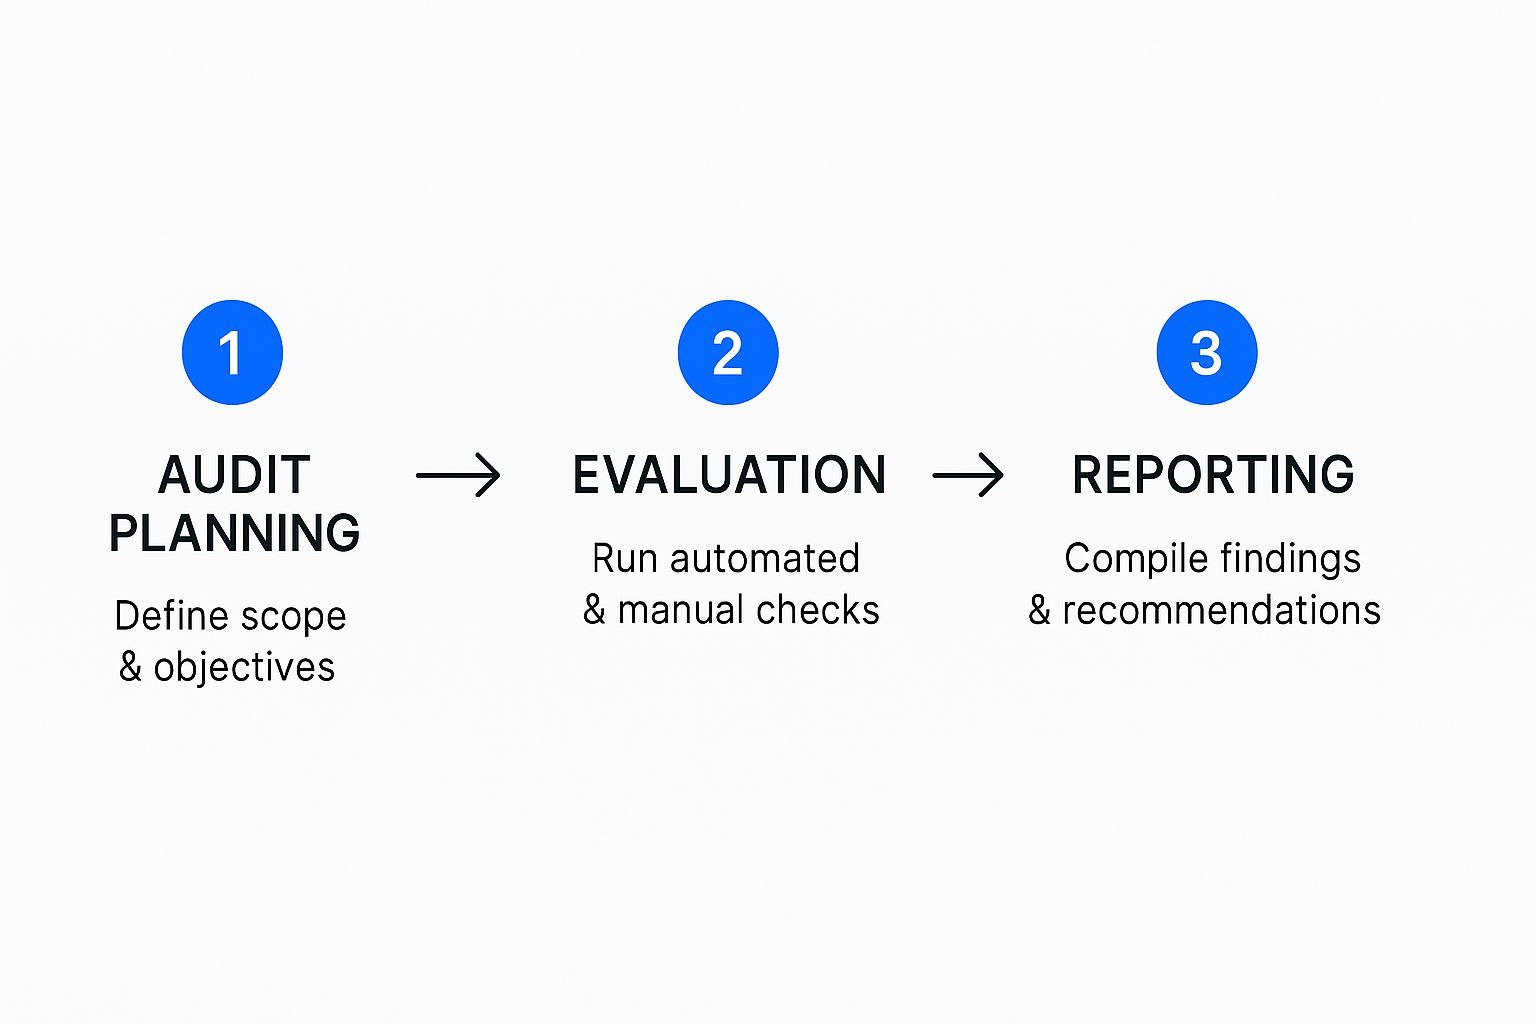
What this visual really highlights is that a proper audit is a structured process. It moves logically from planning and scoping, through the actual evaluation, and all the way to creating reports that people can actually act on. It’s so much more than just running a quick scan; it's a full cycle of strategy, hands-on work, and clear communication.
To help break it down, here’s a look at the core stages involved.
Key Stages of a Web Accessibility Audit
| Phase | Objective | Key Activities |
|---|---|---|
| 1. Scoping & Preparation | Define the audit's goals, scope, and success criteria. | Select WCAG conformance level (e.g., AA), identify key pages and user flows, choose testing tools. |
| 2. Automated Testing | Quickly identify common, code-level accessibility issues. | Run automated scans to check for issues like missing alt text, low color contrast, and empty links. |
| 3. Manual Testing | Evaluate complex and contextual accessibility barriers. | Perform keyboard-only navigation, screen reader testing, content structure review, and form validation. |
| 4. Reporting & Analysis | Document all findings clearly and prioritize issues. | Create a detailed report with screenshots, code snippets, and specific WCAG criteria for each issue. |
| 5. Remediation Planning | Create an actionable roadmap for developers to fix the problems. | Group issues by priority (critical, high, medium), assign them to teams, and set realistic timelines. |
Ultimately, following these phases ensures you're not just finding problems but are setting your team up to fix them effectively.
The main reasons you'd want to run an audit like this really boil down to a few key benefits:
Legal Compliance: First and foremost, it helps ensure your site meets legal requirements like the Americans with Disabilities Act (ADA) and Section 508. This isn't something to take lightly.
Audience Expansion: You’re making your website usable for a massive, often overlooked, segment of the population. We're talking about the one in four adults in the U.S. who live with a disability.
Brand Reputation: A truly accessible website sends a powerful message. It shows you're serious about inclusion and that you value every single user, which is a huge win for your brand's image.
TLDR; Don't think of a web accessibility audit as just a box-ticking exercise for compliance. It’s a strategic move that can seriously boost your business. An inaccessible site is more than a technical problem—it actively pushes customers away, tarnishes your brand, and leaves money on the table. When almost every top website is failing basic accessibility, getting it right gives you a massive competitive edge.
Why Audits Are a Business Imperative
Looking at a web accessibility audit as just a way to dodge legal issues is a huge missed opportunity. Yes, compliance matters, but the real win comes from weaving accessibility into the very fabric of your business strategy. An inaccessible website doesn't just put up walls for users with disabilities; it actively turns away potential customers and chips away at the trust you’ve built.
Think about it. A customer using a screen reader tries to buy something from your site but can't because the "Add to Cart" button isn't labeled correctly. They don't just leave; they tell their friends about the frustrating experience. That kind of feedback spreads, shaping your brand's reputation in a way no marketing campaign can fix.
The Widespread Digital Divide
The scale of this problem is genuinely staggering. It's not a fringe issue affecting a handful of websites; it’s a systemic failure across the entire internet.
The 2025 WebAIM Million report dropped a bombshell: a mind-blowing 94.8% of the top one million home pages had detectable WCAG failures. That statistic should be a wake-up call. It points to a massive gap between how we build websites and what it takes to make them truly inclusive.
This isn't just about code errors. It's about millions of people being shut out of online services, shopping, and information. For any business, that translates directly into lost sales and a smaller market.
"Prioritizing accessibility isn't just a defensive move against litigation. It's an offensive strategy to capture a loyal market segment, build an inclusive brand reputation, and drive innovation by solving complex user experience challenges."
Unlocking Untapped Market Potential
The spending power of people with disabilities, along with their friends and family, is enormous. This is a huge, loyal market that far too many companies ignore. By running a thorough web accessibility audit and actually acting on what you find, you're opening your doors to this audience.
Here’s what that really means for your bottom line:
A Bigger Customer Base: When your website works for everyone, you naturally increase your potential audience. It’s that simple.
Serious Brand Loyalty: Customers who have been excluded elsewhere will stick with brands that deliver a great, accessible experience.
A Nice SEO Boost: It turns out that many accessibility best practices, like using semantic HTML and adding alt text to images, are also fantastic for SEO.
A Spark for Innovation: When you solve accessibility challenges, you often stumble upon smarter, more intuitive solutions for everyone. A navigation system designed for screen reader users, for instance, is often much easier for mobile users to handle, too.
Beyond Compliance Toward Strategic Growth
The goal here isn't just to pass an audit. The audit is the diagnostic tool; the real work starts when you use those insights to build a culture of inclusive design. It's about making accessibility a reflex, not an afterthought. Integrating user feedback for compliance processes is a great way to ensure you're not just meeting standards but actually serving your users.
By committing to regular audits and ongoing improvement, you're doing more than just squashing bugs. You're building a stronger, more user-friendly, and more profitable business that truly welcomes everyone.
tldr; A great web accessibility audit isn’t about just running a tool. It’s about solid prep work. Before you touch a line of code, you need to nail down exactly what you're testing (key pages and user journeys), decide on your target WCAG level (usually AA), get the right people in the room, and pick your go-to testing tools. The whole point is to think about the real people using assistive tech, not just checking off a compliance list.
Laying the Groundwork for a Meaningful Audit
Jumping straight into testing is a classic mistake. It feels productive, but without a clear plan, you'll just end up with a messy, unactionable report. A little bit of strategy upfront makes all the difference, turning a daunting task into a focused, high-impact project.
Think of it this way: you wouldn't start building a house without a blueprint. The same principle applies here. The first and most important piece of that blueprint is defining what’s in and out of scope.
For most companies, testing an entire website is just not feasible. The smart move is to focus on a representative sample of pages and, critically, the most important user flows. If you run an e-commerce site, that means auditing the entire path from searching for a product to checking out. For a SaaS app, you'd want to cover the sign-up and onboarding experience from start to finish.
Defining Your Scope and Standards
Once you know what you're testing, you have to decide what you’re measuring it against. This is where the Web Content Accessibility Guidelines (WCAG) are your North Star. You’ll need to pick a conformance level to aim for.
Level A: This is the absolute minimum. It addresses the most severe and common barriers for users with disabilities.
Level AA: This is the sweet spot and the de facto standard for most organizations and legal requirements worldwide.
Level AAA: Consider this the gold standard. While it's often impossible to meet for an entire site, it’s a fantastic goal for certain features or components.
For almost everyone, WCAG 2.1 Level AA is the target you should be aiming for. It strikes the perfect balance, ensuring your site is robustly accessible and aligned with international law without being overly restrictive.
Assembling the Right Team
An audit is a team sport. You don’t need a giant committee, but you absolutely need a mix of perspectives to get a complete picture. A well-rounded audit team usually includes:
Developers: They’re essential for digging into the code and figuring out why something is broken.
UI/UX Designers: They can provide crucial context on visual design choices, color contrast, and the logic behind user flows.
QA Testers: With their sharp eye for detail, they are perfect for methodically executing the testing plan.
Content Creators: They can help fix issues tied to page copy, heading structure, and alternative text for images.
Getting this cross-functional group involved from day one is key. It ensures that when you find problems, the people who can fix them are already part of the conversation.
A web accessibility audit should be less like a final exam and more like a collaborative workshop. The goal isn't just to find flaws but to build a shared understanding of inclusive design across your entire team.
Choosing Your Toolkit
A thorough audit always uses a mix of automated tools and manual testing. It’s smart to get your toolkit sorted out before you begin.
Automated Scanners:
These are great for a first pass to catch the low-hanging fruit. Think of them as your spell-check for accessibility. Browser extensions like WAVE and Axe DevTools can instantly spot common programmatic errors like missing alt text or contrast violations.
Assistive Technologies:
This is where the real insights come from. You need to step into the shoes of your users and experience your site the way they do. Your manual testing checklist must include:
Screen Readers: You need to get comfortable with NVDA (free for Windows), VoiceOver (built into macOS/iOS), or JAWS (the enterprise standard). This is non-negotiable for understanding the experience for blind and visually impaired users.
Keyboard-Only Navigation: The easiest test in the world. Unplug your mouse and see if you can use your entire site with just the Tab, Enter, and arrow keys. You'll be amazed at what you uncover.
Voice Control Software: Tools like Dragon NaturallySpeaking can reveal how well your site works for people with limited mobility who rely on voice commands to navigate.
By locking in your scope, standards, team, and tools, you’re creating a repeatable and efficient process. This upfront work is what separates a frustrating, dead-end audit from one that drives real, positive change.
A solid web accessibility audit is never a one-and-done automated scan. To get the full picture, you need a combination of automated tools and real, human-led testing.
Think of it this way: automated tools are great at catching about 30-40% of accessibility issues—the low-hanging fruit like missing alt text or obvious color contrast failures. But the most significant, experience-breaking barriers? Those are almost always found by a human navigating your site with a keyboard or a screen reader.
Combining Automated and Manual Testing
Relying only on automated tools is like using a spell-checker to edit a novel. It'll find the typos, but it has no idea if the plot makes sense. On the flip side, starting with purely manual testing is inefficient; you'll spend hours finding basic errors that a tool could have flagged in minutes.
The real magic happens when you let automation handle the heavy lifting first, clearing out the simple code-based errors, and then follow up with nuanced, human-led testing to uncover how the site actually feels to use. This blended approach is the only way to catch everything from tiny programmatic flaws to major usability roadblocks.
The Power and Limits of Automated Scanning
Automated accessibility tools are your first line of defense. They’re lightning-fast, capable of crawling hundreds of pages to flag clear violations of WCAG success criteria. They're your high-speed reconnaissance team, perfect for identifying technical problems right in the code.
Here's what they're really good at finding:
Missing Alt Text: Spotting
<img>tags that are missing an alt attribute.Color Contrast Ratios: Calculating the mathematical contrast between foreground and background colors.
Empty Links or Buttons: Flagging interactive elements that have no text or label for a screen reader to announce.
Improper ARIA Implementation: Detecting when ARIA attributes are used incorrectly, which can do more harm than good.
Tools like WAVE, for example, give you an instant report by overlaying your site with icons that pinpoint these kinds of errors. For a deeper dive, it's worth brushing up on automated testing best practices.
Here’s a quick look at what WAVE’s feedback looks like in action.
As you can see, the icons clearly mark contrast errors, missing alt text, and structural issues, making them easy to spot.
But here’s the catch: automation has massive blind spots. A tool can confirm an image has alt text, but it can’t tell you if that alt text is actually useful. It will happily pass alt="image123.jpg", which is completely meaningless to someone using a screen reader.
Automated tools can find what's programmatically wrong, but only manual testing can reveal what feels broken to a human being. Context, usability, and logical flow are things a machine simply cannot comprehend.
Getting Hands-On with Manual Testing
This is where the real detective work begins. Manual testing means putting yourself in the shoes of users with different disabilities and trying to accomplish tasks on your website the way they would. This is how you find the nuanced, frustrating issues that automated scans always miss.
Your manual testing should zero in on a few key user scenarios.
Keyboard-Only Navigation
Unplug your mouse. Seriously. This is one of the most revealing tests you can do. Try to use your website—every link, button, form field, and menu—with only the Tab, Shift+Tab, Enter, and arrow keys.
As you tab through the site, keep an eye out for these classic pitfalls:
Visible Focus Indicator: Can you always see exactly which element is selected? If the focus outline is faint or missing, a keyboard user is flying blind.
Logical Tabbing Order: Does the focus move through the page in a predictable way? Or does it jump from the header to the footer and back to a sidebar, making no logical sense?
Keyboard Traps: Do you ever get stuck? Some components, like pop-up modals or embedded media players, can trap your focus, leaving you with no way to get out without a mouse.
Imagine trying to fill out a form, but the focus indicator vanishes when you land on the "State" dropdown. You're stuck. That’s a critical barrier that only manual keyboard testing will catch.
Screen Reader Experience
To truly grasp what your site is like for blind or visually impaired users, you have to test with a screen reader. Grab a free tool like NVDA for Windows or use the VoiceOver that's already built into Apple devices. These tools read the page content aloud based on the underlying code.
Don't just listen—evaluate. Ask yourself:
Are links descriptive? If a screen reader announces "Click here" or "Learn More" with no context, the user has no idea where that link is going.
Do images make sense? Does the alt text provide useful information, or is it just generic keyword stuffing?
Can you fill out forms? Are all form fields clearly connected to their labels? An unlabeled input field is a total mystery.
Is the heading structure logical? A proper heading hierarchy (H1, H2, H3) acts like a table of contents, allowing users to quickly scan and jump to different sections.
For example, on a product page, a screen reader should announce the product name as a main heading (H1), followed by sections like "Description" and "Customer Reviews" as subheadings (H2). If you’ve just used bold text instead of proper heading tags, the page becomes a confusing, unstructured wall of text. We've got a great rundown of more web accessibility testing tools if you want to explore other options.
By blending the broad, rapid checks of automated tools with the deep, empathetic insights of manual testing, your audit will give you a complete and actionable picture of your site's true accessibility.
TL;DR: An audit report is dead on arrival if it’s too technical for your boss or too vague for your developers. The trick is to create a clear, actionable roadmap. Document every issue with its location, impact, and a link to the specific WCAG rule it breaks. Then, prioritize the fixes by severity and create tailored summaries for different audiences so everyone knows exactly where to start.
Turning Findings Into Action-Oriented Reports

So you've finished the testing phase of your web accessibility audit, and now you're sitting on a mountain of data. Here's the hard truth: raw data doesn't fix websites. Clear, compelling reports do.
The single biggest mistake I see teams make is creating a dense, overly technical document that no one can actually use. A great report does more than just list errors; it translates your complex findings into a prioritized roadmap for change that your team can get behind.
Your goal is to tell a story about each issue you found. What is it? Where does it live on the site? Who does it affect, and why does it matter? This narrative approach turns an abstract compliance checklist into a set of human-centered problems that people are genuinely motivated to solve.
Structuring a Report for Maximum Impact
An effective report is built on a foundation of clarity and empathy for the people who have to fix the problems. Think of each documented issue as a mini-brief for a developer. Forget long, generic descriptions—every entry needs to be concise and immediately actionable.
For every barrier you document, make sure you include these key pieces of information:
Issue Title: Keep it simple and clear (e.g., "Missing Alt Text on Homepage Hero Image").
Location: Pinpoint the exact URL and include a screenshot. Visual context is everything.
Problem Description: Explain what’s wrong and who it impacts (e.g., "The main promotional image lacks descriptive alt text, so screen reader users have no idea what it shows.").
WCAG Guideline: Cite the specific success criterion that’s being violated (e.g., "Fails WCAG 1.1.1 Non-text Content").
Suggested Remediation: Offer clear, technical guidance on how to fix it.
This structured approach is what turns findings into developer tickets. We share more practical tips on how to effectively check, measure, and document website accessibility in another one of our guides.
Prioritizing Issues for a Phased Approach
Let's be real: not all accessibility issues are created equal. A minor color contrast problem on a footer link is a world away from a checkout button that's completely broken for keyboard users. Prioritization is how you ensure your team tackles the biggest blockers first, delivering the most meaningful improvements to users as quickly as possible.
I've found that a simple prioritization matrix works wonders:
| Severity Level | Description & Impact | Example |
|---|---|---|
| Critical | Stops a user from completing a core task or getting essential information. | A "Submit Application" button that a keyboard user can't activate. |
| High | Causes serious frustration or makes a task much harder than it needs to be. | A complex form with unlabeled fields that’s a nightmare for screen reader users. |
| Medium | An inconvenience that gets in the way but doesn't completely block the user. | A link with generic "click here" text that forces users to guess its destination. |
| Low | A technical violation of WCAG that has a minimal impact on the actual user experience. | An image with alt text that works but could be more descriptive. |
Using a tiered system like this helps you transform that overwhelming list of problems into a manageable, step-by-step project plan.
Your audit report shouldn't just be a list of what's broken. It should be a compelling business case for inclusion, demonstrating the real-world impact of barriers and providing a clear path to a better user experience for everyone.
Tailoring Communication for Different Audiences
A one-size-fits-all report is a recipe for inaction. Your executives, project managers, and developers all speak different languages and need information presented in a way that resonates with them.
For Executives: Give them the high-level summary. Focus on the big picture: the overall compliance score, critical legal risks, and the business case for fixing things. Use charts and graphs to make key problem areas and potential progress easy to grasp.
For Developers: This is where you get into the weeds. Your structured issue documentation is their bible. Include code snippets, direct links to the official WCAG documentation, and specific technical recommendations they can run with.
The global importance of getting this right is massive. The World Health Organization estimates that roughly 1.3 billion people live with some form of disability. What’s often overlooked is that 70-80% of these disabilities are 'hidden'—like cognitive or hearing impairments that are directly affected by how a website is built. A well-crafted report is the tool that enables your organization to finally address the needs of this huge audience.
tldr; An audit's real worth is in the action it inspires. The key is to create a detailed remediation plan by breaking down every issue into manageable tickets for tools like Jira, assigning owners, and setting clear deadlines. But fixing today's problems isn't enough; you must shift to a proactive culture. This means training your teams, embedding automated checks into your development pipeline, and making accessibility a core part of the design process from day one to prevent future issues.
Building Your Remediation and Prevention Plan
Let's be honest: a web accessibility audit report is just a document. Its real value isn't in identifying the problems, but in sparking the action that fixes them. The goal is to turn that comprehensive report from a static checklist into a living, breathing roadmap for genuine improvement.
The first step is translating every issue you've found into a specific, actionable ticket in your project management tool, whether that's Jira, Asana, or Trello. Each ticket needs to be crystal clear, detailing what the problem is, where to find it, which WCAG criterion it fails, and a recommended fix. Most importantly, assign each ticket a clear owner and a realistic deadline. This creates accountability and keeps the momentum going.
From Fixing Problems to Preventing Them
Simply fixing the accessibility bugs you find today is like playing a never-ending game of whack-a-mole. You patch one issue, and two more pop up in the next release. The real win is shifting your organization's culture so that accessibility is baked in from the start, not bolted on at the end.
Getting ahead of these issues means building a proactive mindset. Here's what that looks like in practice:
Continuous Team Training: Your designers, developers, and content writers can't build what they don't know. Regular training gives them the skills to create inclusive experiences from the get-go.
Automated Checks in Your Pipeline: Weave automated accessibility testing directly into your CI/CD pipeline. This acts as a safety net, catching many common errors long before they ever see the light of day.
Accessibility as a Design Pillar: Make accessibility a non-negotiable part of your design system and a core requirement during the product discovery phase.
By embracing these website accessibility best practices, you can finally break the reactive "audit-and-fix" cycle.
Building a Long-Term Accessibility Strategy
This cultural shift isn't just a good idea—it's becoming a business necessity. Legal requirements are getting tighter across the globe. We're seeing more enforceable regulations with real teeth, and several major deadlines are just around the corner.
For instance, the European Accessibility Act (EAA) comes into full effect in June 2025. This law requires that most digital products and services sold in the EU comply with specific standards based on WCAG 2.1 AA. You can learn more about how to get ready by reading up on the evolving digital accessibility landscape on allyant.com.
A great remediation plan does two things perfectly. First, it systematically resolves every issue you uncovered today. Second, it puts the processes and training in place to ensure you don't have to fix the same kinds of problems again tomorrow. It’s all about building a more inclusive foundation for the future.
Got questions about web accessibility audits? You're not alone. Let's walk through some of the most common ones we hear from teams just getting started.
tldr; We'll cover the big questions right here. You should audit your site at least once a year. Automated tools are helpful, but they only catch about 30-40% of the real problems. Aim for WCAG Level AA—it's the global standard. And yes, bringing in an outside expert is often a very smart move for an unbiased, thorough review.
Common Questions About Web Accessibility Audits
Diving into your first accessibility audit can feel a little overwhelming. Below are some straightforward answers to clear up the confusion and help you move forward with confidence.
How Often Should We Conduct a Web Accessibility Audit?
Think of a full-scale audit as an annual physical for your website. You absolutely need to do a comprehensive one at least once a year to stay on top of evolving standards and catch any issues that have crept in.
But don't stop there. It's also a good idea to run smaller, focused audits whenever you make a big change, like launching a redesign or adding a major new feature. To really stay ahead, weave accessibility into your routine. Run automated scans during your development sprints and do quick manual checks of key user flows—like the checkout or login process—every quarter.
The real goal is to make accessibility an ongoing part of your process, not just a one-off project. Regular check-ins keep you compliant and ensure everyone has a great experience, all the time.
Can We Rely Solely on Automated Accessibility Tools?
In a word: no. This is a huge misconception. Automated tools are fantastic for a first pass. They're fast and great at catching the low-hanging fruit—things like missing alt text or simple color contrast problems. They'll typically find about 30-40% of WCAG issues.
But they can't tell you if your site is actually usable. They don't understand context, logical order, or how a real person navigates with a screen reader. That's where manual testing comes in. Having a human—especially one who uses assistive technology—go through your site is the only way to find the critical barriers that truly frustrate users.
What Is the Difference Between WCAG Level A, AA, and AAA?
It helps to think of these as different tiers of achievement, with each level building on the one before it.
Level A: This is the bare minimum. Meeting these criteria fixes the most serious and frustrating roadblocks that would completely prevent someone with a disability from using your site.
Level AA: This is the sweet spot and the accepted standard for most websites and legal requirements worldwide. It addresses more nuanced but still significant barriers, leading to a genuinely accessible experience.
Level AAA: This is the gold standard. It’s the highest level of accessibility and can be very difficult to achieve across an entire site. It's usually reserved for sites or features specifically serving audiences with disabilities.
For nearly every organization, your audit goal should be to meet WCAG 2.1 Level AA.
Do We Need to Hire an External Expert for Our Audit?
Running an audit internally is a great way to build skills and awareness on your team. But bringing in an outside expert brings a few key advantages to the table.
An external auditor offers a completely fresh and unbiased perspective, free from any internal politics or assumptions. They live and breathe WCAG guidelines and assistive tech, so their expertise runs deep. A third-party report also carries more weight, which can be invaluable for showing due diligence and validating the hard work your team has done.
Ready to move beyond questions and start building a more inclusive website? WebAbility.io offers an end-to-end platform with automated scanning, real-time monitoring, and expert audit services to help you achieve and maintain compliance with confidence. Discover how we can simplify your accessibility journey at https://www.webability.io.
Quick Questions
Tap to ask AI about this article